[大模型]Qwen2.5-1.5B微调流程(自用笔记)
浅浅记录一下从0跑通+微调+推理 Qwen2.5-1.5B大模型的全程
本篇笔记是在记录跑通+微Qwen2.5-1.5B大模型的流程,自用,仅供参考。
0. 前言
Qwen2.5-1.5B大模型的官方github地址:https://github.com/QwenLM/Qwen2.5
1. 安装LLaMA-Factory
鉴于网上大部分的教程都是使用的llama-factory来进行的微调,包括qwen2.5的官方github中也贴有llama-factory的example
首先,在相应的地址进行克隆项目我这个是在windows下运行的,所以使用的是git bash
git clone --depth 1 https://github.com/hiyouga/LLaMA-Factory.git
cd LLaMA-Factory
pip install -e ".[torch,metrics]"

然后创建新的环境 此处建议创建新环境,防止已有环境会起冲突。需要提前安装anaconda
conda create -n llama-factory python=3.11
conda activate llama-factory
然后,安装llama-factory的依赖包 cd为进入所克隆项目的路径
cd LLaMA-Factory
pip install -e ".[torch,metrics]"

最后,验证是否安装成功
llamafactory-cli version
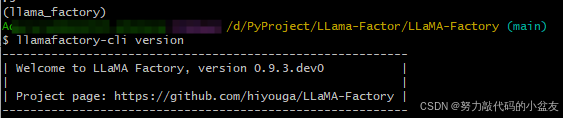
至此,llama-factory安装完成。
2. 下载模型
此处我使用的是modelscope下载,因为要快一些。需要先安装一下modelscope。
pip install modelscope
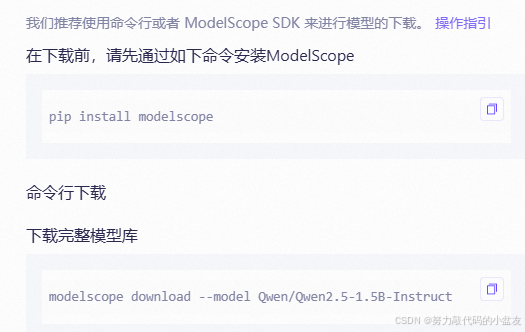
modelscope download --model Qwen/Qwen2.5-1.5B-Instruct --local_dir your_path/Qwen2.5-1.5B-Instruct
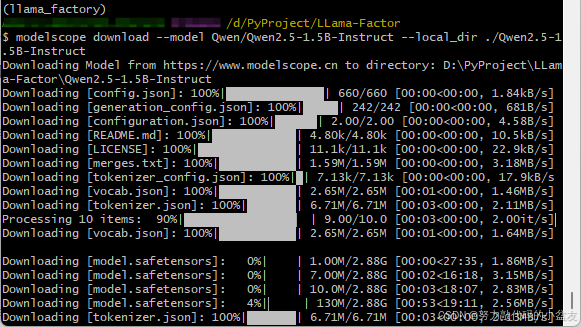
至此,模型下载完成。
3. 数据集准备
根据github中的官方文档写的数据集的格式为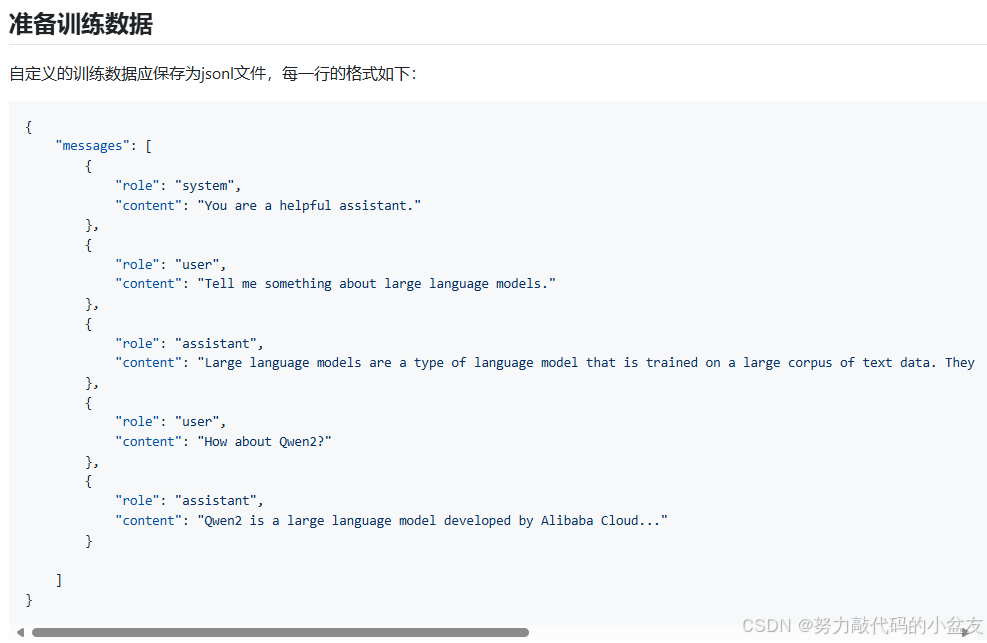
数据集准备完成后,注册自定义的训练数据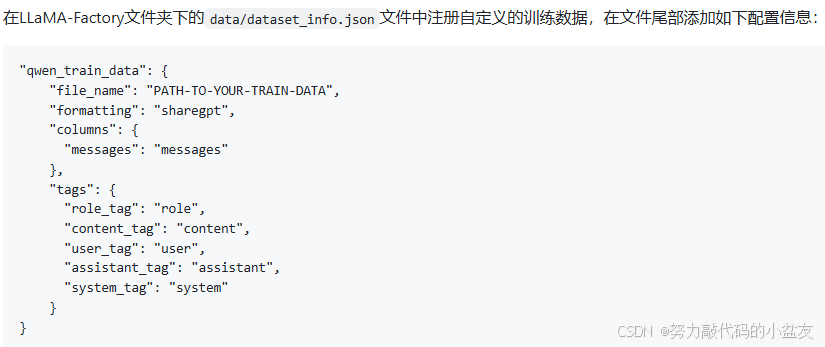
4. 训练yaml文件编写
新建一个llama_qwen_train.yaml文件(名字可以自己取),把训练相关参数复制进去,一些值也可以根据自己情况进行修改。此处我参考的是qwen官方文档https://github.com/QwenLM/Qwen2.5/blob/main/examples/llama-factory/finetune-zh.md
和这篇文章LLM基础学习03:Qwen2.5-1.5B-Instruct指令微调全流程实践——LLaMA Factory框架与GSM8K评估
官方文档的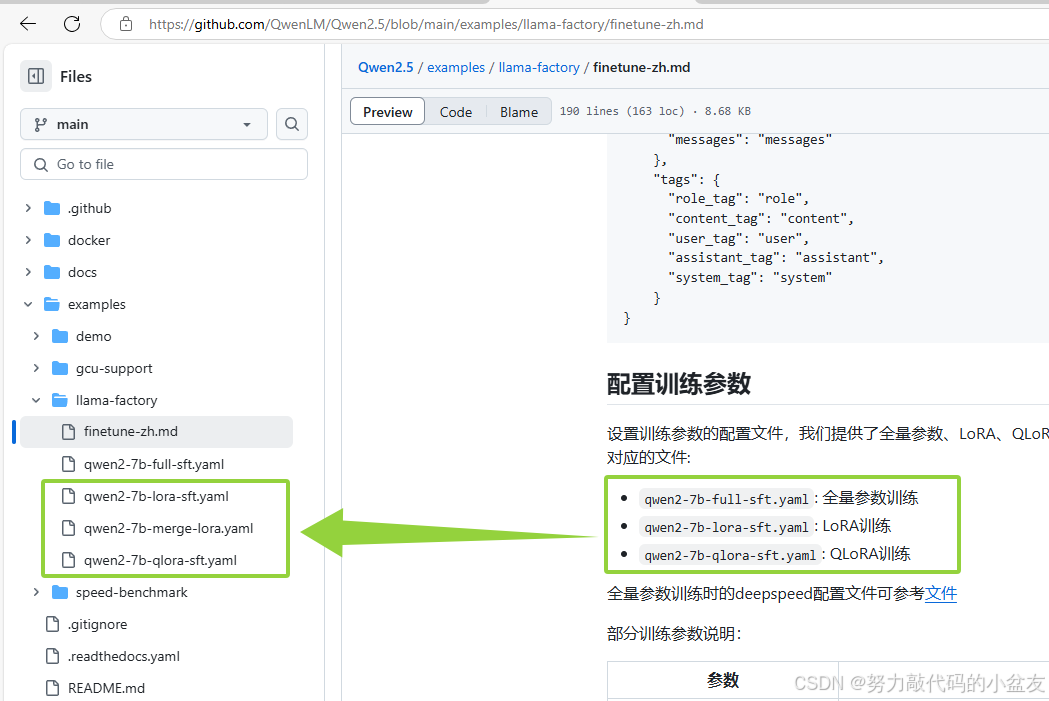
另一篇文章的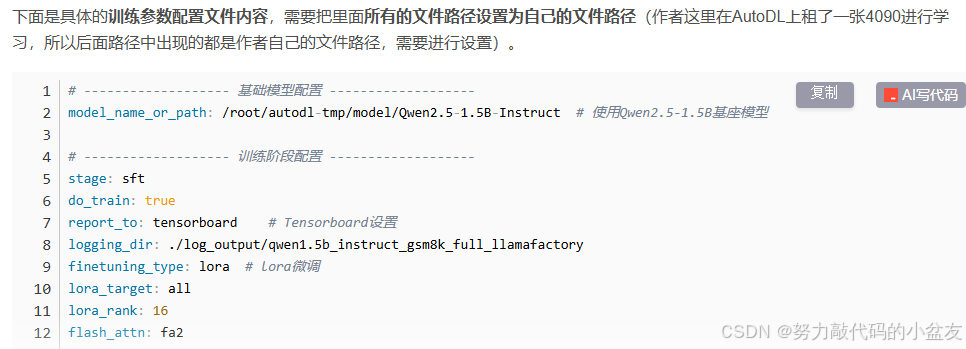
5. 训练
编写完训练参数的yaml文件以后运行,使用以下命令进行运行
llamafactory-cli train llama_qwen_train.yaml
命令行运行以后报错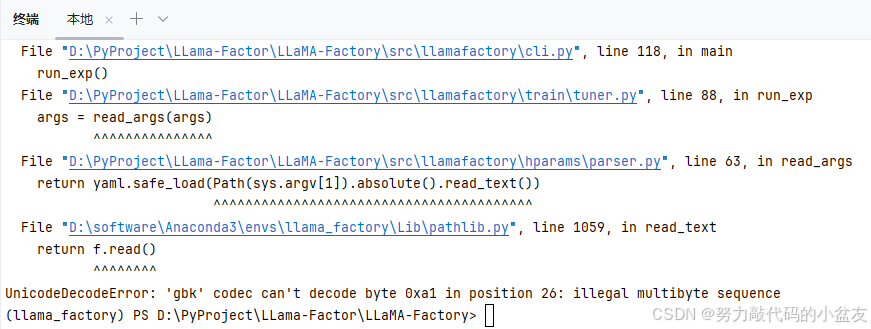
解决方案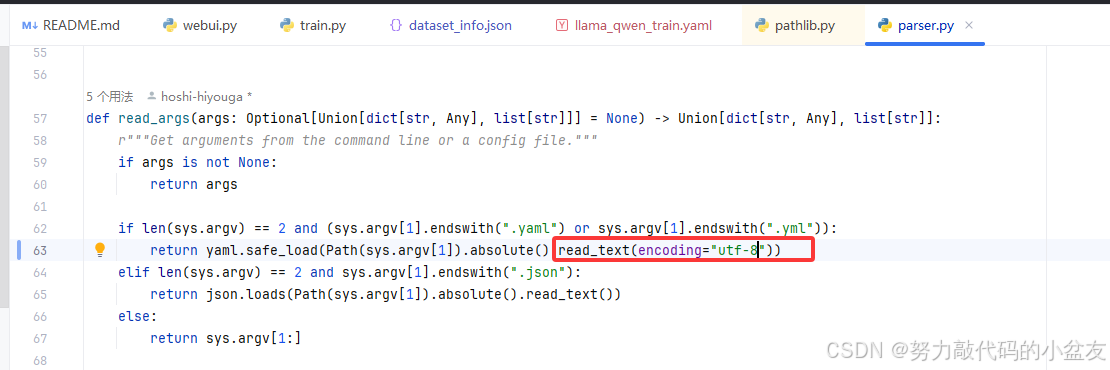
然后成功运行
6. 合并模型
依旧参考上述所提的官方文档,进行模型的合并
7. 模型推理
使用合并好的模型进行推理,依旧采用的是官方文档
from transformers import AutoModelForCausalLM, AutoTokenizer
device = "cuda" # the device to load the model onto
model_name_or_path = YOUR-MODEL-PATH

model = AutoModelForCausalLM.from_pretrained(
    model_name_or_path,
    torch_dtype="auto",
    device_map="auto"
)
tokenizer = AutoTokenizer.from_pretrained(model_name_or_path)

prompt = "Give me a short introduction to large language model."
messages = [
    {"role": "system", "content": "You are a helpful assistant."},
    {"role": "user", "content": prompt}
]
text = tokenizer.apply_chat_template(
    messages,
    tokenize=False,
    add_generation_prompt=True
)
model_inputs = tokenizer([text], return_tensors="pt").to(device)

generated_ids = model.generate(
    model_inputs.input_ids,
    max_new_tokens=512
)
generated_ids = [
    output_ids[len(input_ids):] for input_ids, output_ids in zip(model_inputs.input_ids, generated_ids)
]

response = tokenizer.batch_decode(generated_ids, skip_special_tokens=True)[0]
使用官方文档以后attention_mask,pad_token_id报错,参考此篇文章attention_mask,pad_token_id报错,修改后的代码如下
import torch
from transformers import AutoModelForCausalLM, AutoTokenizer
device = "cuda" # the device to load the model onto
model_name_or_path = "lora微调后的模型地址"

model = AutoModelForCausalLM.from_pretrained(
    model_name_or_path,
    torch_dtype="auto",
    device_map="auto"
)
tokenizer = AutoTokenizer.from_pretrained(model_name_or_path)

prompt = "xxx"

messages = [
    {"role": "system", "content": "xxx"},
    {"role": "user", "content": prompt}
]
text = tokenizer.apply_chat_template(
    messages,
    tokenize=False,
    add_generation_prompt=True
)
model_inputs = tokenizer([text], return_tensors="pt").to(device)
input_ids = tokenizer.encode(text, return_tensors="pt")
attention_mask = torch.ones(input_ids.shape, dtype=torch.long, device=device)

generated_ids = model.generate(
    model_inputs.input_ids,
    attention_mask=attention_mask,
    max_new_tokens=512,
    pad_token_id=tokenizer.eos_token_id,
)
generated_ids = [
    output_ids[len(input_ids):] for input_ids, output_ids in zip(model_inputs.input_ids, generated_ids)
]

response = tokenizer.batch_decode(generated_ids, skip_special_tokens=True)[0]

print(response)
结束语
浅浅记录一下从0跑通+微调+推理 Qwen2.5-1.5B大模型的全程

火山引擎开发者社区是火山引擎打造的AI技术生态平台,聚焦Agent与大模型开发,提供豆包系列模型(图像/视频/视觉)、智能分析与会话工具,并配套评测集、动手实验室及行业案例库。社区通过技术沙龙、挑战赛等活动促进开发者成长,新用户可领50万Tokens权益,助力构建智能应用。
更多推荐
 27
27 0
0- 0


 已为社区贡献1条内容

所有评论(0)