【Qwen3-VL】:使用Qwen3-VL+Streamlit搭建图片理解|2D|3D目标检测平台
本文介绍了一个基于Streamlit框架搭建的3D目标检测平台,该平台具备三种检测模式(图片理解、2D目标检测、3D目标检测)和智能提示词构建功能。系统采用模块化设计,包含相机参数工具、API客户端、图像处理、2D/3D可视化等核心模块。平台支持从JSON文件加载相机参数或自动生成参数,并提供完整的可视化功能,包括3D边界框在2D图像上的投影显示和历史记录管理。通过使用Qwen3-VL多模态模型,
我们将使用Streamlit框架搭建一个目标检测平台,将代码分模块划分,提高可维护性。创建一个3d_object_detection_platform文件,项目结构如下:
3d_object_detection_platform/
├── app.py                 # 主应用文件
├── modules/
│   ├── __init__.py
│   ├── api_client.py      # API客户端模块
│   ├── image_utils.py     # 图像处理工具
│   ├── visualization.py   # 可视化模块
│   ├── visualization_2d.py   # 2D可视化模块
│   └── camera_utils.py    # 相机参数工具
主要功能特点
-
三种检测模式:
-
图片理解:普通的多模态对话
-
2D目标检测:传统的边界框检测
-
3D目标检测:带深度信息的空间检测
-
-
智能提示词构建:根据检测模式自动构建合适的提示词
-
灵活的相机参数:
-
支持从JSON文件加载相机参数
-
支持自动生成相机参数
-
支持手动调整相机参数
-
-
完整的可视化:3D边界框在2D图像上的投影显示
-
历史记录管理:支持查看、清空、导出历史记录
这个平台充分利用了Qwen3-VL的多模态能力,特别是3D空间理解能力,为用户提供了一个强大的3D目标检测工具。
-
camera_utils.py
import json
import math
import numpy as np
from PIL import Image
import os

class CameraUtils:
    @staticmethod
    def load_camera_params(image_name, json_path='./spatial_understanding/cam_infos.json'):
        """
        从JSON文件中加载指定图像的相机参数

        参数:
            image_name (str): 图像文件名,用作查找相机参数的键
            json_path (str): 包含相机参数的JSON文件路径,默认为'./spatial_understanding/cam_infos.json'

        返回:
            dict or None: 成功时返回对应图像的相机参数字典,失败或未找到时返回None
        """
        try:
            # 检查JSON文件是否存在
            if os.path.exists(json_path):
                with open(json_path, 'r') as f:
                    cam_infos = json.load(f)
                # 返回指定图像的相机参数,如果不存在则返回None
                return cam_infos.get(image_name, None)
            return None
        except Exception as e:
            print(f"加载相机参数失败: {e}")
            return None

    @staticmethod
    def generate_camera_params(image_path, fx=None, fy=None, cx=None, cy=None, fov=60):
        """
        根据图像尺寸和可选的相机内参生成相机参数

        参数:
            image_path (str): 图像文件路径,用于获取图像尺寸
            fx (float): 相机x轴焦距,如果为None则根据视场角计算
            fy (float): 相机y轴焦距,如果为None则根据视场角计算
            cx (float): 相机光心x坐标,如果为None则设为图像宽度的一半
            cy (float): 相机光心y坐标,如果为None则设为图像高度的一半
            fov (int): 相机视场角(度),默认为60度,用于计算焦距

        返回:
            dict: 包含相机内参的字典,包括fx, fy, cx, cy四个参数
        """
        try:
            # 打开图像并获取尺寸
            image = Image.open(image_path)
            w, h = image.size

            # 如果未提供焦距参数,则根据视场角和图像尺寸计算
            if fx is None or fy is None:
                # 使用宽高的平均值来计算焦距,让fx和fy相同
                avg_dimension = (w + h) / 2
                focal_length = round(avg_dimension / (2 * np.tan(np.deg2rad(fov) / 2)), 2)
                fx = focal_length
                fy = focal_length

            # 如果未提供光心坐标,则设置为图像中心
            if cx is None or cy is None:
                cx = round(w / 2, 2)
                cy = round(h / 2, 2)

            return {'fx': fx, 'fy': fy, 'cx': cx, 'cy': cy}
        except Exception as e:
            print(f"生成相机参数失败: {e}")
            # 返回默认参数
            return {'fx': 1000, 'fy': 1000, 'cx': 640, 'cy': 360}
该模块提供了加载现有相机参数或根据图像尺寸生成新相机参数的工具,主要用于3D目标检测中的空间定位计算。
-
load_camera_params方法
@staticmethod
def load_camera_params(image_name, json_path='./spatial_understanding/cam_infos.json')
此方法从JSON文件中加载特定图像的相机参数:
-
使用
image_name作为键查找相机参数 -
从默认路径
./spatial_understanding/cam_infos.json读取JSON文件 -
如果找到则返回相机参数字典,否则返回
None -
包含异常处理,出错时返回
None
-
generate_camera_params方法
@staticmethod
def generate_camera_params(image_path, fx=None, fy=None, cx=None, cy=None, fov=60)
此方法根据图像属性生成相机参数:
-
打开图像获取尺寸信息
-
如果未提供焦距参数 (
fx,fy),则根据视场角(FOV)和图像尺寸计算:-
使用宽高平均值计算焦距
-
公式:
focal_length = avg_dimension / (2 * tan(radians(fov) / 2))
-
-
如果未提供光心坐标 (
cx,cy),则设置为图像中心点 -
返回包含四个相机内参的字典:
fx,fy,cx,cy -
出错时返回默认参数:
{'fx': 1000, 'fy': 1000, 'cx': 640, 'cy': 360}
核心功能
-
灵活的参数处理:
-
支持部分参数提供,自动计算缺失值
-
可以处理各种图像尺寸
-
-
错误处理机制:
-
文件读取错误时返回
None -
参数生成失败时使用默认值
-
-
标准相机模型:
-
使用针孔相机模型的四个基本内参
-
fx,fy:x和y方向的焦距 -
cx,cy:主点坐标(光学中心)
-
-
视场角集成:
-
支持通过FOV参数计算更真实的焦距值
-
应用场景
在主应用中,该工具类用于3D目标检测流程:
-
首先尝试加载图像预设的相机参数
-
如果没有预设参数,则根据图像和用户设置的FOV自动生成
-
为3D可视化模块提供准确的相机参数以正确渲染3D边界框
这种设计使系统既能处理预校准的相机(使用 load_camera_params),也能处理任意上传的图像(使用 generate_camera_params))。
-
api_client.py
import os
import base64
import json
from openai import OpenAI
from dotenv import load_dotenv

load_dotenv()

class APIClient:
    """
    API客户端类,用于与ModelScope和DashScope等平台的视觉语言模型进行交互。

    属性:
        ms_api_key (str): ModelScope平台的API密钥。
        ms_base_url (str): ModelScope平台的基础URL。
        dash_api_key (str): DashScope平台的API密钥。
        dash_base_url (str): DashScope平台的基础URL。
    """

    def __init__(self):
        self.ms_api_key = os.getenv("ms_api_key")
        self.ms_base_url = os.getenv("ms_base_url")
        self.dash_api_key = os.getenv("dash_api_key")
        self.dash_base_url = os.getenv("dash_base_url")

    def encode_image(self, image_path):
        """
        将本地图片转换为Base64编码

        参数:
            image_path (str): 图片文件路径

        返回:
            str: Base64编码后的图片数据
        """
        with open(image_path, "rb") as image_file:
            return base64.b64encode(image_file.read()).decode('utf-8')

    def inference_with_api(self, image_path, prompt, api_type="modelscope",
                          high_resolution=False, model_name=None):
        """
        使用指定平台的API进行图像理解推理

        参数:
            image_path (str): 待分析图片的路径
            prompt (str): 提供给模型的问题或指令
            api_type (str): API类型,可选"modelscope"或"dashscope"
            high_resolution (bool): 是否启用高分辨率图像处理模式
            model_name (str): 指定使用的具体模型名称

        返回:
            str: 模型返回的文本结果

        异常:
            FileNotFoundError: 当指定的图片文件不存在时抛出
        """
        if not os.path.exists(image_path):
            raise FileNotFoundError(f"图片文件不存在: {image_path}")

        # 根据API类型设置对应的认证信息和默认模型
        if api_type == "modelscope":
            api_key = self.ms_api_key
            base_url = self.ms_base_url
            if model_name is None:
                model_name = 'Qwen/Qwen3-VL-235B-A22B-Instruct'
        else:  # dashscope
            api_key = self.dash_api_key
            base_url = self.dash_base_url
            if model_name is None:
                model_name = "qwen3-vl-plus"

        base64_image = self.encode_image(image_path)

        client = OpenAI(api_key=api_key, base_url=base_url)

        # 构造多模态消息体:包含图片和文本提示
        messages = [
            {
                "role": "user",
                "content": [
                    {
                        "type": "image_url",
                        "image_url": {
                            "url": f"data:image/jpeg;base64,{base64_image}"
                        },
                    },
                    {"type": "text", "text": prompt},
                ],
            }
        ]

        # 配置额外参数(如是否开启思考过程、是否使用高清图像)
        extra_body = {
            'enable_thinking': False,
            "vl_high_resolution_images": high_resolution
        }

        # 调用API并获取响应
        response = client.chat.completions.create(
            model=model_name,
            messages=messages,
            stream=False,
            extra_body=extra_body
        )

        return response.choices[0].message.content

    def parse_json_response(self, text: str):
        """
        从可能被markdown代码块语法包围的字符串中提取纯JSON内容

        参数:
            text (str): 输入字符串,可能包含类似```json ... ```的markdown代码围栏

        返回:
            str: 清理后的纯JSON字符串,去除了周围的markdown标记
        """
        if not text:
            return ""

        # 解析markdown代码围栏结构
        lines = text.splitlines()
        for i, line in enumerate(lines):
            if line.strip() == "```json":
                # 找到json代码块开始位置,并提取后续内容
                json_output = "\n".join(lines[i+1:])
                # 去除结束标记后的内容
                json_output = json_output.split("```")[0]
                return json_output.strip()
            elif line.strip().startswith("```") and "json" in line.strip():
                # 处理在同一行内的```json格式
                json_part = line.split("```")[1].replace("json", "").strip()
                remaining = "\n".join(lines[i+1:])
                json_output = json_part + "\n" + remaining
                json_output = json_output.split("```")[0]
                return json_output.strip()

        # 若无代码块,则尝试识别原始JSON对象或数组
        text = text.strip()
        if text.startswith('[') and text.endswith(']'):
            return text
        elif text.startswith('{') and text.endswith('}'):
            return text

        # 最终尝试通过括号匹配提取JSON片段
        start_idx = text.find('[')
        end_idx = text.rfind(']')
        if start_idx != -1 and end_idx != -1 and end_idx > start_idx:
            return text[start_idx:end_idx+1]

        start_idx = text.find('{')
        end_idx = text.rfind('}')
        if start_idx != -1 and end_idx != -1 and end_idx > start_idx:
            return text[start_idx:end_idx+1]

        return text

    def parse_bbox_3d_from_text(self, text: str):
        """
        从响应文本中解析3D边界框信息

        参数:
            text (str): 包含3D边界框数据的响应文本

        返回:
            list: 解析得到的3D边界框列表,若解析失败则返回空列表
        """
        try:
            json_str = self.parse_json_response(text)
            if not json_str:
                return []

            # 解析JSON数据
            bbox_data = json.loads(json_str)

            # 统一输出为列表形式
            if isinstance(bbox_data, list):
                return bbox_data
            elif isinstance(bbox_data, dict):
                return [bbox_data]
            else:
                return []

        except (json.JSONDecodeError, IndexError, KeyError) as e:
            print(f"解析3D边界框失败: {e}")
            return []

    def parse_bbox_2d_from_text(self, text: str):
        """
        从响应文本中解析2D边界框信息

        参数:
            text (str): 包含2D边界框数据的响应文本

        返回:
            list: 解析得到的2D边界框列表,若解析失败则返回空列表
        """
        try:
            json_str = self.parse_json_response(text)
            if not json_str:
                return []

            # 解析JSON数据
            bbox_data = json.loads(json_str)

            # 统一输出为列表形式
            if isinstance(bbox_data, list):
                return bbox_data
            elif isinstance(bbox_data, dict):
                return [bbox_data]
            else:
                return []

        except (json.JSONDecodeError, IndexError, KeyError) as e:
            print(f"解析2D边界框失败: {e}")
            return []
该模块是整个应用的核心通信组件,负责调用外部AI服务API进行图像理解和目标检测任务,并处理返回结果的解析工作。
主要组成部分
-
类初始化和环境配置
class APIClient:
    def __init__(self):
        self.ms_api_key = os.getenv("ms_api_key")
        self.ms_base_url = os.getenv("ms_base_url")
        self.dash_api_key = os.getenv("dash_api_key")
        self.dash_base_url = os.getenv("dash_base_url")
-
从环境变量中加载ModelScope和DashScope平台的API密钥及基础URL
-
支持两个主流的大模型服务平台
-
图像编码功能
def encode_image(self, image_path):
-
将本地图片文件转换为Base64编码格式
-
用于构建符合API要求的图像数据格式
-
核心推理方法
def inference_with_api(self, image_path, prompt, api_type="modelscope",
                      high_resolution=False, model_name=None):
这是最重要的方法,负责调用AI模型进行推理:
-
支持两种API类型:ModelScope和DashScope
-
默认使用Qwen3-VL系列模型(ModelScope的
Qwen/Qwen3-VL-235B-A22B-Instruct和DashScope的qwen3-vl-plus) -
支持高分辨率图像处理模式
-
构建多模态请求消息体,包含Base64编码的图像和文本提示
-
返回模型的文本响应结果
-
响应解析功能
JSON响应清理
def parse_json_response(self, text: str):
-
从可能包含Markdown代码块标记的响应中提取纯净的JSON内容
-
处理多种可能的格式(带代码块、不带代码块等)
-
提取有效的JSON对象或数组
3D边界框解析
def parse_bbox_3d_from_text(self, text: str):
-
专门用于解析3D目标检测结果
-
将响应文本转换为3D边界框数据列表
-
处理各种异常情况并返回空列表
2D边界框解析
def parse_bbox_2d_from_text(self, text: str):
-
专门用于解析2D目标检测结果
-
将响应文本转换为2D边界框数据列表
-
同样具备异常处理能力
关键特性
-
双平台支持:
-
同时兼容ModelScope和DashScope两大平台
-
可根据不同需求切换API服务
-
-
多模态处理:
-
支持图像和文本的联合输入
-
自动处理图像Base64编码
-
-
灵活配置:
-
支持高分辨率模式
-
可指定不同的模型名称
-
可配置额外参数如思考过程开关
-
-
健壮的解析能力:
-
能处理各种格式的模型输出
-
包含完善的错误处理机制
-
对不规范的JSON格式有较强的容错能力
-
-
环境变量管理:
-
通过
.env文件管理敏感的API密钥 -
提高安全性并便于部署
-
在整体应用中的作用
在主应用 app.py 中,APIClient是连接前端界面和后端AI服务的关键桥梁:
-
接收用户上传的图像和设置参数
-
调用合适的AI模型进行推理
-
解析模型返回的结果供后续可视化模块使用
这个设计使得应用能够充分利用Qwen3-VL等先进视觉语言模型的能力,实现高质量的图像理解和3D目标检测功能。
-
image_utils.py
import os
import uuid
from PIL import Image
import io

class ImageUtils:
    @staticmethod
    def save_uploaded_file(uploaded_file, upload_dir="uploaded_images"):
        """
        保存上传的文件到指定目录

        参数:
            uploaded_file: 上传的文件对象,需要包含name属性和getbuffer方法
            upload_dir: 保存文件的目录路径,默认为"uploaded_images"

        返回:
            tuple: 包含文件完整路径和唯一文件名的元组 (file_path, unique_filename)
        """
        # 检查并创建上传目录
        if not os.path.exists(upload_dir):
            os.makedirs(upload_dir)

        # 生成唯一文件名
        file_extension = os.path.splitext(uploaded_file.name)[1]
        unique_filename = f"{uuid.uuid4()}{file_extension}"
        file_path = os.path.join(upload_dir, unique_filename)

        # 保存文件
        with open(file_path, "wb") as f:
            f.write(uploaded_file.getbuffer())

        return file_path, unique_filename

    @staticmethod
    def resize_image(image_path, max_size=(800, 600)):
        """
        调整图片大小以适应显示

        参数:
            image_path: 图片文件的路径
            max_size: 图片最大尺寸元组(width, height),默认为(800, 600)

        返回:
            PIL.Image: 调整大小后的Image对象
        """
        # 打开图片并调整大小
        image = Image.open(image_path)
        image.thumbnail(max_size, Image.Resampling.LANCZOS)

        # 处理透明背景图片
        if image.mode in ('RGBA', 'LA'):
            background = Image.new('RGB', image.size, (255, 255, 255))
            background.paste(image, mask=image.split()[-1])
            image = background

        return image
这个模块提供了一套完整的图像处理工具,主要包含两个核心功能:
1. 文件保存功能 save_uploaded_file
-
功能:安全地保存上传的图像文件
-
实现细节
-
自动创建目标目录(如果不存在)
-
使用UUID生成唯一文件名,避免命名冲突
-
提取原始文件扩展名保持文件格式一致性
-
返回文件存储路径和唯一文件名便于后续访问
-
2. 图像缩放功能resize_image
-
功能:优化图像显示尺寸并处理格式兼容性
-
实现细节
-
使用高质量重采样算法(LANCZOS)保持图像清晰度
-
最大尺寸限制为800x600像素防止过大显示问题
-
特殊处理透明背景图像,将其转换为白色背景的JPEG格式
-
支持RGBA和LA模式图像的兼容性处理
-
-
visualization.py
# 导入所需的库
import random
import math
import cv2
import numpy as np
import matplotlib.pyplot as plt
from PIL import Image

class Visualization3D:
    """
    3D可视化类,用于在2D图像上绘制3D边界框
    """
    def __init__(self):
        """
        初始化函数
        设置中文字体支持
        """
        self._setup_chinese_font()

    def _setup_chinese_font(self):
        """
        设置matplotlib支持中文字体
        防止中文显示为方块
        """
        plt.rcParams['font.sans-serif'] = ['SimHei', 'Microsoft YaHei', 'DejaVu Sans']
        plt.rcParams['axes.unicode_minus'] = False

    def convert_3dbbox(self, point, cam_params):
        """
        将3D边界框转换为2D图像坐标

        参数:
        point: 3D边界框参数 [x, y, z, x_size, y_size, z_size, pitch, yaw, roll]
        cam_params: 相机参数字典,包含 'fx', 'fy', 'cx', 'cy'

        返回:
        img_corners: 投影到图像上的角点坐标列表
        """
        # 解析3D边界框参数
        x, y, z, x_size, y_size, z_size, pitch, yaw, roll = point

        # 计算边界框的半尺寸
        hx, hy, hz = x_size / 2, y_size / 2, z_size / 2

        # 定义局部坐标系下的8个角点
        local_corners = [
            [ hx,  hy,  hz],   # 0
            [ hx,  hy, -hz],   # 1
            [ hx, -hy,  hz],   # 2
            [ hx, -hy, -hz],   # 3
            [-hx,  hy,  hz],   # 4
            [-hx,  hy, -hz],   # 5
            [-hx, -hy,  hz],   # 6
            [-hx, -hy, -hz]    # 7
        ]

        # 预计算三角函数值以提高效率
        cos_roll = math.cos(roll)
        sin_roll = math.sin(roll)
        cos_pitch = math.cos(pitch)
        sin_pitch = math.sin(pitch)
        cos_yaw = math.cos(yaw)
        sin_yaw = math.sin(yaw)

        img_corners = []

        # 对每个角点进行变换和投影
        for corner in local_corners:
            # 获取局部坐标
            x0, y0, z0 = corner

            # 执行欧拉角旋转: Yaw(偏航) -> Pitch(俯仰) -> Roll(翻滚)

            # Yaw (绕Y轴旋转)
            x1 = x0 * cos_yaw + z0 * sin_yaw
            y1 = y0
            z1 = -x0 * sin_yaw + z0 * cos_yaw

            # Pitch (绕X轴旋转)
            x2 = x1
            y2 = y1 * cos_pitch - z1 * sin_pitch
            z2 = y1 * sin_pitch + z1 * cos_pitch

            # Roll (绕Z轴旋转)
            x3 = x2 * cos_roll - y2 * sin_roll
            y3 = x2 * sin_roll + y2 * cos_roll
            z3 = z2

            # 平移到世界坐标系
            X, Y, Z = x3 + x, y3 + y, z3 + z

            # 透视投影到图像平面
            if Z > 0:  # 只处理相机前方的点
                x_2d = cam_params['fx'] * (X / Z) + cam_params['cx']
                y_2d = cam_params['fy'] * (Y / Z) + cam_params['cy']
                img_corners.append([x_2d, y_2d])

        return img_corners

    def draw_3dbboxes(self, image_path, cam_params, bbox_3d_list):
        """
        在图像上绘制3D边界框并返回matplotlib图形

        参数:
        image_path: 图像文件路径
        cam_params: 相机参数字典
        bbox_3d_list: 3D边界框列表,每个元素可以是字典或列表

        返回:
        fig: matplotlib图形对象,如果出错则返回None
        """
        try:
            # 读取图像
            annotated_image = cv2.imread(image_path)
            if annotated_image is None:
                print(f"无法读取图像: {image_path}")
                return None

            # 定义立方体的12条边(连接角点的索引对)
            edges = [
                [0,1], [2,3], [4,5], [6,7],  # 水平边
                [0,2], [1,3], [4,6], [5,7],  # 垂直边
                [0,4], [1,5], [2,6], [3,7]   # 深度边
            ]

            all_label_positions = []
            # 为每个边界框绘制3D框
            for bbox_data in bbox_3d_list:
                # 处理不同格式的数据输入
                if isinstance(bbox_data, dict) and 'bbox_3d' in bbox_data:
                    bbox_3d = bbox_data['bbox_3d']
                    label = bbox_data.get('label', 'object')
                else:
                    bbox_3d = bbox_data
                    label = 'object'

                # 将边界框参数转换为列表
                bbox_3d = list(bbox_3d)

                # 将角度从度转换为弧度
                pitch_rad = np.deg2rad(bbox_3d[6])
                yaw_rad = np.deg2rad(bbox_3d[7])
                roll_rad = np.deg2rad(bbox_3d[8])

                # 更新角度值为弧度
                bbox_3d[6] = pitch_rad
                bbox_3d[7] = yaw_rad
                bbox_3d[8] = roll_rad

                # 将3D边界框投影到2D图像
                bbox_2d = self.convert_3dbbox(bbox_3d, cam_params)

                # 确保有足够的角点进行绘制
                if len(bbox_2d) >= 8:
                    # 为每个框生成随机颜色
                    box_color = [random.randint(0, 255) for _ in range(3)]

                    # 绘制所有边
                    for start, end in edges:
                        try:
                            pt1 = tuple([int(_pt) for _pt in bbox_2d[start]])
                            pt2 = tuple([int(_pt) for _pt in bbox_2d[end]])
                            cv2.line(annotated_image, pt1, pt2, box_color, 2)

                            # 在第一个角点处添加标签
                            if start == 0:
                                all_label_positions.append((bbox_2d[0][0], bbox_2d[0][1]-10, label, box_color))
                        except:
                            continue

            # 将BGR图像转换为RGB以适应matplotlib显示
            annotated_image_rgb = cv2.cvtColor(annotated_image, cv2.COLOR_BGR2RGB)

            # 创建matplotlib图形
            fig, ax = plt.subplots(1, 1, figsize=(12, 8))
            ax.imshow(annotated_image_rgb)
            for x, y, label_text, color in all_label_positions:
                ax.text(x, y, label_text, fontsize=12, color=np.array(color)/255.0, verticalalignment='bottom')
            ax.axis('off')

            return fig

        except Exception as e:
            print(f"绘制3D边界框时出错: {e}")
            return None
该模块是3D目标检测应用的可视化组件,负责将模型预测的3D边界框数据投影到2D图像上,并以直观的方式呈现给用户。
主要组成部分
-
类初始化和字体设置
class Visualization3D:
    def __init__(self):
        self._setup_chinese_font()

    def _setup_chinese_font(self):
        plt.rcParams['font.sans-serif'] = ['SimHei', 'Microsoft YaHei', 'DejaVu Sans']
        plt.rcParams['axes.unicode_minus'] = False
-
初始化时设置matplotlib支持中文字体
-
防止中文标签显示为方块
-
3D到2D坐标转换核心方法
def convert_3dbbox(self, point, cam_params):
这是最核心的方法,负责将3D边界框坐标转换为2D图像坐标:
-
输入参数:
-
point: 3D边界框参数[x, y, z, x_size, y_size, z_size, pitch, yaw, roll] -
cam_params: 相机参数字典,包含'fx', 'fy', 'cx', 'cy'
-
-
处理流程:
-
解析3D边界框参数
-
计算边界框的半尺寸
-
定义局部坐标系下的8个角点(立方体顶点)
-
预计算三角函数值提高效率
-
对每个角点执行欧拉角旋转(Yaw→Pitch→Roll顺序)
-
平移到世界坐标系
-
透视投影到图像平面
-
返回投影后的2D角点坐标列表
-
-
3D边界框绘制方法
def draw_3dbboxes(self, image_path, cam_params, bbox_3d_list):
这是主要的绘图方法,负责在图像上绘制多个3D边界框:
-
输入参数:
-
image_path: 图像文件路径 -
cam_params: 相机参数字典 -
bbox_3d_list: 3D边界框列表
-
-
处理流程:
-
处理不同格式的数据输入(字典或列表)
-
将角度从度转换为弧度
-
调用 [convert_3dbbox](file://e:\2025\大模型\Qwen\Qwen3-VL\学习\03-三维目标定位\app\modules\visualization.py#L44-L107) 方法进行3D到2D投影
-
为每个框生成随机颜色
-
绘制12条边线
-
添加标签文本
-
读取原始图像
-
定义立方体的12条边(连接8个角点)
-
遍历每个3D边界框:
-
将BGR图像转换为RGB格式
-
使用matplotlib创建图形并显示结果
-
关键技术和算法
-
3D坐标变换
采用标准的欧拉角旋转顺序(Yaw→Pitch→Roll):
-
Yaw(偏航): 绕Y轴旋转
-
Pitch(俯仰): 绕X轴旋转
-
Roll(翻滚): 绕Z轴旋转
-
透视投影
使用经典的针孔相机模型进行投影:
x_2d = fx * (X / Z) + cx
y_2d = fy * (Y / Z) + cy
-
立方体表示
使用8个角点和12条边来表示3D边界框:
角点索引:
    0----1
   /|   /|
  4----5 |
  | |  | |
  | 2--|-3
  |/   |/
  6----7
特色功能
-
灵活的数据格式支持:
-
支持字典格式(包含'label'字段)
-
支持列表格式的边界框数据
-
-
自动单位转换:
-
自动将角度从度转换为弧度进行计算
-
-
可视化增强:
-
为每个边界框生成随机颜色以便区分
-
在图像上显示物体标签
-
使用matplotlib提供高质量的图形输出
-
-
错误处理:
-
包含完整的异常处理机制
-
出错时返回None而不是崩溃
-
-
性能优化:
-
预计算三角函数值避免重复计算
-
只处理相机前方的点(Z > 0)
-
在整体应用中的作用
在主应用app.py是3D目标检测结果可视化的关键组件:
-
接收来自
APIClient解析的3D边界框数据 -
利用
CameraUtils提供的相机参数 -
将3D边界框投影到2D图像上并绘制
-
返回matplotlib图形供Streamlit界面显示
这个模块使得用户能够直观地看到3D目标检测的结果,大大增强了应用的可用性和用户体验。
-
visualization_2d.py
import matplotlib.pyplot as plt
import matplotlib.patches as patches
from PIL import Image
import numpy as np
import json

class Visualization2D:
    """
    用于在图像上绘制二维边界框(bounding boxes)和对应标签的可视化工具类
    """

    def __init__(self):
        """
        初始化函数,设置中文字体支持以确保中文显示正常
        """
        self._setup_chinese_font()

    def _setup_chinese_font(self):
        """
        配置matplotlib使用支持中文的字体,并关闭unicode负号替换功能
        """
        plt.rcParams['font.sans-serif'] = ['SimHei', 'Microsoft YaHei', 'DejaVu Sans']
        plt.rcParams['axes.unicode_minus'] = False

    def draw_bboxes_2d(self, image_path, bbox_data, output_path=None):
        """
        在指定图像上绘制2D边界框及标签信息,并可选择性地将结果保存为文件

        参数:
            image_path (str): 输入图像的路径
            bbox_data (list or str): 边界框数据,可以是字典列表、坐标列表或JSON字符串形式
            output_path (str, optional): 输出图像的保存路径,默认为None表示不保存

        返回:
            matplotlib.figure.Figure: 包含绘图结果的Figure对象,可用于进一步操作或展示
        """
        try:
            # 读取输入图像
            image = Image.open(image_path)
            raw_width, raw_height = image.size

            # 创建绘图画布
            fig, ax = plt.subplots(1, figsize=(12, 8))

            # 将图像显示在画布上
            ax.imshow(image)

            # 定义一组颜色用于区分不同边界框
            colors = [
                '#FF0000', '#00FF00', '#0000FF', '#FFFF00', '#FF00FF', '#00FFFF',
                '#FFA500', '#800080', '#008000', '#FFC0CB', '#FFD700', '#4B0082',
                '#00FF7F', '#DC143C', '#8A2BE2', '#7CFC00', '#FF4500', '#DA70D6',
                '#20B2AA', '#FF69B4', '#32CD32', '#BA55D3', '#9370DB', '#3CB371'
            ]

            # 存储处理后的边界框信息
            processed_bboxes = []

            # 如果输入的是字符串,则尝试将其解析为JSON格式的数据
            if isinstance(bbox_data, str):
                try:
                    bbox_data = json.loads(bbox_data)
                except json.JSONDecodeError:
                    print("无法解析JSON字符串")
                    return fig

            # 处理列表类型的边界框数据
            if isinstance(bbox_data, list):
                for item in bbox_data:
                    if isinstance(item, dict):
                        # 判断是否存在有效的边界框字段并提取相关信息
                        bbox_key = None
                        if 'bbox_2d' in item:
                            bbox_key = 'bbox_2d'
                        elif 'bbox' in item:
                            bbox_key = 'bbox'
                        elif 'bounding_box' in item:
                            bbox_key = 'bounding_box'

                        if bbox_key and item.get(bbox_key):
                            processed_bboxes.append({
                                "bbox": item[bbox_key],
                                "label": item.get("label", "unknown"),
                                "score": item.get("score", 1.0)
                            })
                    elif isinstance(item, list) and len(item) >= 4:
                        # 若为直接坐标列表,则默认标签为"object"
                        processed_bboxes.append({
                            "bbox": item,
                            "label": "object",
                            "score": 1.0
                        })

            print(f"处理后的2D边界框数据: {processed_bboxes}")

            # 遍历所有处理好的边界框进行绘制
            for i, item in enumerate(processed_bboxes):
                bbox = item["bbox"]
                label = item["label"]
                score = item["score"]
                color = colors[i % len(colors)]

                # 根据边界框坐标的数值范围判断其是否需要转换成像素单位
                if len(bbox) == 4:
                    if bbox[2] > 1 and bbox[3] > 1:  # 假设是绝对坐标
                        x1, y1, x2, y2 = bbox
                    else:  # 可能是归一化坐标
                        img_w, img_h = image.size
                        x1, y1, x2, y2 = bbox[0]*img_w, bbox[1]*img_h, bbox[2]*img_w, bbox[3]*img_h
                else:
                    print(f"无效的边界框数据: {bbox}")
                    continue

                abs_y1 = int(item["bbox"][1] / 1000 * raw_height)
                abs_x1 = int(item["bbox"][0] / 1000 * raw_width)
                abs_y2 = int(item["bbox"][3] / 1000 * raw_height)
                abs_x2 = int(item["bbox"][2] / 1000 * raw_width)

                if abs_x1 > abs_x2:
                    abs_x1, abs_x2 = abs_x2, abs_x1

                if abs_y1 > abs_y2:
                    abs_y1, abs_y2 = abs_y2, abs_y1

                # 计算边界框的宽度和高度
                width = abs_x2 - abs_x1
                height = abs_y2 - abs_y1

                # 绘制矩形边界框
                rect = patches.Rectangle((abs_x1, abs_y1), width, height,
                                       linewidth=2, edgecolor=color, facecolor='none')
                ax.add_patch(rect)

                # 构造要显示的文本内容并在边界框上方添加标签
                label_text = f"{label}: {score:.2f}" if score < 1.0 else label
                ax.text(abs_x1 + 8, abs_y1 + 6, label_text,
                       bbox=dict(boxstyle="round,pad=0.3", facecolor=color, alpha=0.7),
                       color='white', fontsize=12, weight='bold')

            # 设置图表标题并隐藏坐标轴刻度
            #ax.set_title('2D目标检测结果', fontsize=16)
            ax.axis('off')

            # 如有指定输出路径则保存图像至该位置
            if output_path:
                plt.tight_layout()
                plt.savefig(output_path, dpi=300, bbox_inches='tight')
                print(f"结果已保存到: {output_path}")

            return fig

        except Exception as e:
            print(f"绘制2D边界框时出错: {e}")
            # 出现异常时返回一个包含错误提示的空白图像
            fig, ax = plt.subplots(1, figsize=(12, 8))
            ax.text(0.5, 0.5, f"可视化错误: {str(e)}",
                   ha='center', va='center', transform=ax.transAxes)
            ax.axis('off')
            return fig
该模块是2D目标检测应用的可视化组件,负责将模型预测的2D边界框数据绘制在原始图像上,并以直观的方式呈现给用户。
主要组成部分
-
类初始化和字体设置
class Visualization2D:
    def __init__(self):
        self._setup_chinese_font()

    def _setup_chinese_font(self):
        plt.rcParams['font.sans-serif'] = ['SimHei', 'Microsoft YaHei', 'DejaVu Sans']
        plt.rcParams['axes.unicode_minus'] = False
-
初始化时设置matplotlib支持中文字体
-
防止中文标签显示为方块
-
2D边界框绘制方法
def draw_bboxes_2d(self, image_path, bbox_data, output_path=None):
这是主要的绘图方法,负责在图像上绘制2D边界框:
-
输入参数:
-
image_path: 输入图像的路径 -
bbox_data: 边界框数据(可以是列表、字典或JSON字符串) -
output_path: 可选的输出图像保存路径
-
-
返回值:
-
matplotlib.figure.Figure对象,用于进一步操作或展示
-
处理流程详解
-
图像读取和画布创建
image = Image.open(image_path)
fig, ax = plt.subplots(1, figsize=(12, 8))
ax.imshow(image)
-
使用PIL打开原始图像
-
创建matplotlib图形和坐标轴
-
在坐标轴上显示原始图像
-
颜色配置
colors = ['#FF0000', '#00FF00', '#0000FF', ...]
-
预定义一组24种颜色,用于区分不同的边界框
-
通过取模运算循环使用这些颜色
-
数据解析和处理
if isinstance(bbox_data, str):
    try:
        bbox_data = json.loads(bbox_data)
    except json.JSONDecodeError:
        print("无法解析JSON字符串")
        return fig
-
支持多种输入格式:
-
JSON字符串:自动解析为Python对象
-
字典列表:包含边界框坐标和标签信息
-
坐标列表:直接的坐标值
-
-
边界框数据标准化
for item in bbox_data:
    if isinstance(item, dict):
        # 处理不同键名的边界框数据
        bbox_key = None
        if'bbox_2d'in item:
            bbox_key = 'bbox_2d'
        elif'bbox'in item:
            bbox_key = 'bbox'
        elif'bounding_box'in item:
            bbox_key = 'bounding_box'

        if bbox_key and item.get(bbox_key):
            processed_bboxes.append({
                "bbox": item[bbox_key],
                "label": item.get("label", "unknown"),
                "score": item.get("score", 1.0)
            })
-
支持多种边界框字段名称(
bbox_2d、bbox、bounding_box等) -
提取标签和置信度信息
-
为缺失字段提供默认值
-
坐标系统处理
if len(bbox) == 4:
    if bbox[2] > 1 and bbox[3] > 1:  # 假设是绝对坐标
        x1, y1, x2, y2 = bbox
    else:  # 可能是归一化坐标
        img_w, img_h = image.size
        x1, y1, x2, y2 = bbox[0]*img_w, bbox[1]*img_h, bbox[2]*img_w, bbox[3]*img_h
-
自动识别坐标系统(绝对坐标 vs 归一化坐标)
-
根据图像尺寸进行相应转换
-
边界框绘制
# 计算边界框的宽度和高度
width = abs_x2 - abs_x1
height = abs_y2 - abs_y1

# 绘制矩形边界框
rect = patches.Rectangle((abs_x1, abs_y1), width, height,
                       linewidth=2, edgecolor=color, facecolor='none')
ax.add_patch(rect)
-
使用matplotlib的Rectangle补丁绘制边界框
-
设置线条宽度、颜色等样式属性
-
标签文本添加
label_text = f"{label}: {score:.2f}" if score < 1.0 else label
ax.text(abs_x1 + 8, abs_y1 + 6, label_text,
       bbox=dict(boxstyle="round,pad=0.3", facecolor=color, alpha=0.7),
       color='white', fontsize=12, weight='bold')
-
在边界框附近添加标签文本
-
包含类别名称和可选的置信度分数
-
使用彩色背景框增强可读性
特色功能
-
多格式数据支持:
-
支持JSON字符串、字典列表、坐标列表等多种输入格式
-
自动解析和标准化不同格式的数据
-
-
智能坐标处理:
-
自动识别绝对坐标和归一化坐标
-
根据数值范围判断坐标类型并进行相应转换
-
-
灵活的字段适配:
-
支持多种边界框字段名称
-
为缺失字段提供合理的默认值
-
-
可视化增强:
-
多彩边界框区分不同目标
-
带背景的标签文本提高可读性
-
可选的图像保存功能
-
-
错误处理:
-
完善的异常处理机制
-
出错时显示错误信息而非程序崩溃
-
在整体应用中的作用
在主应用app.py中,Visualization2D是2D目标检测结果可视化的关键组件:
-
接收来自
APIClient解析的2D边界框数据 -
将边界框绘制在原始图像上
-
返回matplotlib图形供Streamlit界面显示
这个模块使得用户能够直观地看到2D目标检测的结果,提升了应用的用户体验和实用性。
-
app.py (主应用文件)
import streamlit as st
import pandas as pd
import os
import tempfile
from modules.api_client import APIClient
from modules.image_utils import ImageUtils
from modules.visualization import Visualization3D
from modules.visualization_2d import Visualization2D
from modules.camera_utils import CameraUtils
# 页面配置
st.set_page_config(
page_title="3D目标检测平台",
page_icon="📦",
layout="wide",
initial_sidebar_state="expanded"
)
# 初始化工具类
api_client = APIClient()
image_utils = ImageUtils()
visualizer_3d = Visualization3D()
visualizer_2d = Visualization2D()
camera_utils = CameraUtils()
# 初始化session state
if 'history' not in st.session_state:
st.session_state.history = pd.DataFrame(columns=['图片名称', '理解结果', '检测模式'])
if 'current_image' not in st.session_state:
st.session_state.current_image = None
if 'current_image_name' not in st.session_state:
st.session_state.current_image_name = None
# 标题
st.title("📦 目标检测平台")
# 侧边栏
with st.sidebar:
st.header("配置")
# 图片上传
uploaded_file = st.file_uploader(
"上传图片",
type=['png', 'jpg', 'jpeg'],
help="支持 PNG, JPG, JPEG 格式"
)
# 检测模式选择
detection_mode = st.radio(
"检测模式",
["图片理解", "2D目标检测", "3D目标检测"],
help="选择不同的检测模式"
)
# 提示词输入
prompt = st.text_area(
"提示词",
placeholder="请输入对图片的提问或要检测的物体名称...",
help="在目标检测模式下,请输入要检测的物体名称"
)
# 目标检测专用设置
if detection_mode in ["2D目标检测", "3D目标检测"]:
st.info("💡 目标检测模式下,请在提示词中输入要检测的物体名称")
# 检测类别设置
if not prompt:
st.warning("请输入要检测的物体名称")
# API选择
api_type = st.selectbox(
"选择API服务",
["modelscope", "dashscope"],
help="选择使用的AI服务提供商"
)
# 高分辨率选项
high_resolution = st.checkbox("高分辨率模式", value=False)
# 相机参数设置(仅3D模式)
if detection_mode == "3D目标检测":
st.subheader("相机参数设置")
fov = st.slider("视场角 (FOV)", 30, 120, 60)
# 处理按钮
process_button = st.button("开始处理", type="primary")
# 处理上传的图片
if uploaded_file is not None:
# 保存上传的图片
image_path, image_name = image_utils.save_uploaded_file(uploaded_file)
st.session_state.current_image = image_path
st.session_state.current_image_name = image_name
# 显示上传的图片
resized_image = image_utils.resize_image(image_path)
st.sidebar.image(resized_image, caption=f"上传的图片: {image_name}", use_column_width=True)
# 处理按钮点击事件
if process_button and st.session_state.current_image:
if not prompt and detection_mode == "图片理解":
st.warning("请输入提示词")
else:
with st.spinner("正在处理图片..."):
try:
# 构建最终的提示词
if detection_mode == "图片理解":
final_prompt = prompt
elif detection_mode == "2D目标检测":
final_prompt = f"找出图片中的所有{prompt}。针对每个{prompt},提供其2D边界框,要求以JSON格式输出: [{{\"bbox_2d\": [x1, y1, x2, y2], \"label\": \"类别名称\"}}]"
else: # 3D目标检测
final_prompt = f"找出图片中的所有{prompt}。针对每个{prompt},提供其3D边界框,要求以JSON格式输出: [{{\"bbox_3d\":[x_center, y_center, z_center, x_size, y_size, z_size, roll, pitch, yaw],\"label\":\"category\"}}]"
# 调用API
response = api_client.inference_with_api(
image_path=st.session_state.current_image,
prompt=final_prompt,
api_type=api_type,
high_resolution=high_resolution
)
st.success("处理完成!")
# 主界面布局
col1, col2 = st.columns(2)
with col1:
st.subheader("上传的图片")
resized_image = image_utils.resize_image(st.session_state.current_image)
st.image(resized_image, use_column_width=True)
with col2:
# st.subheader("分析结果")
if detection_mode == "图片理解":
st.write(response)
elif detection_mode == "2D目标检测":
# 显示原始响应(用于调试)
#with st.expander("查看原始响应"):
# st.text(response)
# 解析2D边界框
parsed_response = api_client.parse_json_response(response)
bbox_2d_results = api_client.parse_bbox_2d_from_text(response)
st.subheader("解析后的2D边界框")
#st.json(bbox_2d_results)
# 可视化2D边界框
with st.spinner("生成2D可视化结果..."):
fig = visualizer_2d.draw_bboxes_2d(
st.session_state.current_image,
bbox_2d_results
)
st.pyplot(fig)
else: # 3D目标检测
# 显示原始响应(用于调试)
#with st.expander("查看原始响应"):
# st.text(response)
# 解析3D边界框
parsed_response = api_client.parse_json_response(response)
bbox_3d_results = api_client.parse_bbox_3d_from_text(response)
st.subheader("解析后的3D边界框")
#st.json(bbox_3d_results)
# 可视化3D边界框
with st.spinner("生成3D可视化结果..."):
# 获取相机参数
if st.session_state.current_image_name and camera_utils.load_camera_params(st.session_state.current_image_name):
cam_params = camera_utils.load_camera_params(st.session_state.current_image_name)
else:
cam_params = camera_utils.generate_camera_params(
st.session_state.current_image,
fov=fov
)
# 绘制3D边界框
fig = visualizer_3d.draw_3dbboxes(
st.session_state.current_image,
cam_params,
bbox_3d_results
)
if fig is not None:
st.pyplot(fig)
else:
st.warning("3D可视化生成失败")
# 添加到历史记录
new_record = pd.DataFrame({
'图片名称': [st.session_state.current_image_name],
'理解结果': [response],
'检测模式': [detection_mode]
})
st.session_state.history = pd.concat([st.session_state.history, new_record], ignore_index=True)
except Exception as e:
st.error(f"处理过程中出现错误: {str(e)}")
# 显示历史记录
st.markdown("---")
st.subheader("历史记录")
if not st.session_state.history.empty:
# 显示历史记录表格
st.dataframe(
st.session_state.history,
use_container_width=True,
hide_index=True
)
# 清空历史记录按钮
col1, col2 = st.columns([1, 4])
with col1:
if st.button("清空历史记录"):
st.session_state.history = pd.DataFrame(columns=['图片名称', '理解结果', '检测模式'])
st.rerun()
with col2:
# 导出历史记录
csv = st.session_state.history.to_csv(index=False).encode('utf-8')
st.download_button(
label="导出历史记录为CSV",
data=csv,
file_name="detection_history.csv",
mime="text/csv"
)
else:
st.info("暂无历史记录")
# 使用说明
with st.expander("使用说明"):
st.markdown("""
### 🎯 平台使用指南
**1. 上传图片**
- 支持 PNG、JPG、JPEG 格式
- 图片大小建议不超过10MB
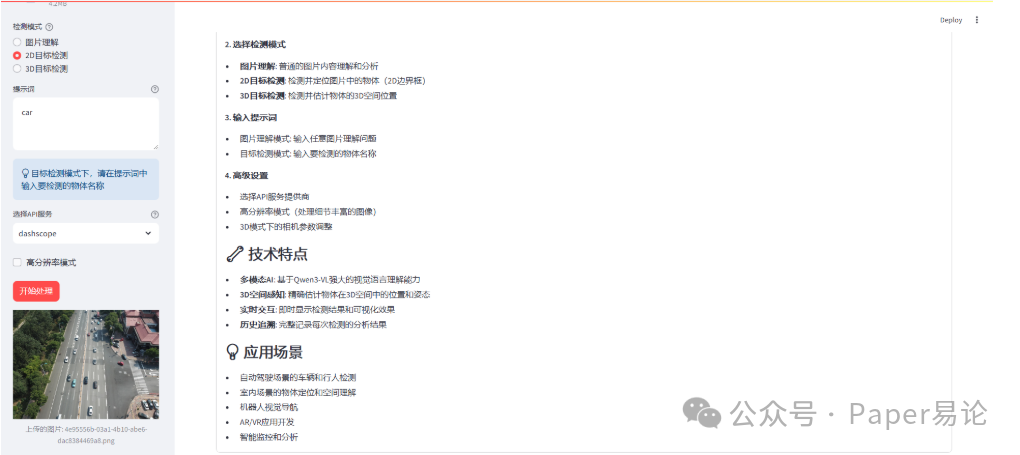
**2. 选择检测模式**
- **图片理解**: 普通的图片内容理解和分析
- **2D目标检测**: 检测并定位图片中的物体(2D边界框)
- **3D目标检测**: 检测并估计物体的3D空间位置
**3. 输入提示词**
- 图片理解模式: 输入任意图片理解问题
- 目标检测模式: 输入要检测的物体名称
**4. 高级设置**
- 选择API服务提供商
- 高分辨率模式(处理细节丰富的图像)
- 3D模式下的相机参数调整
### 🔧 技术特点
- **多模态AI**: 基于Qwen3-VL强大的视觉语言理解能力
- **3D空间感知**: 精确估计物体在3D空间中的位置和姿态
- **实时交互**: 即时显示检测结果和可视化效果
- **历史追溯**: 完整记录每次检测的分析结果
### 💡 应用场景
- 自动驾驶场景的车辆和行人检测
- 室内场景的物体定位和空间理解
- 机器人视觉导航
- AR/VR应用开发
- 智能监控和分析
""")
这个 app.py 文件是一个基于 Streamlit 的 3D 目标检测平台应用程序。它集成了图像理解、2D 目标检测和 3D 目标检测功能,并提供了完整的用户界面和数据可视化。
主要组件和结构
-
导入依赖和初始化
import streamlit as st import pandas as pd import os import tempfile from modules.api_client import APIClient from modules.image_utils import ImageUtils from modules.visualization import Visualization3D from modules.visualization_2d import Visualization2D from modules.camera_utils import CameraUtils -
页面配置
st.set_page_config( page_title="3D目标检测平台", page_icon="📦", layout="wide", initial_sidebar_state="expanded" ) -
初始化工具类和 session state
api_client = APIClient() image_utils = ImageUtils() visualizer_3d = Visualization3D() visualizer_2d = Visualization2D() camera_utils = CameraUtils() if'history'notin st.session_state: st.session_state.history = pd.DataFrame(columns=['图片名称', '理解结果', '检测模式']) if'current_image'notin st.session_state: st.session_state.current_image = None if'current_image_name'notin st.session_state: st.session_state.current_image_name = None -
侧边栏配置
-
图片上传控件
-
检测模式选择(图片理解、2D目标检测、3D目标检测)
-
提示词输入区域
-
API服务选择(modelscope 或 dashscope)
-
高分辨率模式开关
-
3D模式下的相机参数设置(FOV滑块)
-
开始处理按钮
-
-
图片处理逻辑
if uploaded_file is not None: # 保存并显示上传的图片 image_path, image_name = image_utils.save_uploaded_file(uploaded_file) st.session_state.current_image = image_path st.session_state.current_image_name = image_name resized_image = image_utils.resize_image(image_path) st.sidebar.image(resized_image, caption=f"上传的图片: {image_name}", use_column_width=True) -
核心处理逻辑
if process_button and st.session_state.current_image: # 根据不同模式构建提示词 if detection_mode == "图片理解": final_prompt = prompt elif detection_mode == "2D目标检测": final_prompt = f"找出图片中的所有{prompt}。针对每个{prompt},提供其2D边界框..." else: # 3D目标检测 final_prompt = f"找出图片中的所有{prompt}。针对每个{prompt},提供其3D边界框..." # 调用API进行推理 response = api_client.inference_with_api( image_path=st.session_state.current_image, prompt=final_prompt, api_type=api_type, high_resolution=high_resolution ) # 根据模式显示结果 if detection_mode == "图片理解": st.write(response) elif detection_mode == "2D目标检测": bbox_2d_results = api_client.parse_bbox_2d_from_text(response) fig = visualizer_2d.draw_bboxes_2d(st.session_state.current_image, bbox_2d_results) st.pyplot(fig) else: # 3D目标检测 bbox_3d_results = api_client.parse_bbox_3d_from_text(response) # 获取相机参数 if st.session_state.current_image_name and camera_utils.load_camera_params(st.session_state.current_image_name): cam_params = camera_utils.load_camera_params(st.session_state.current_image_name) else: cam_params = camera_utils.generate_camera_params(st.session_state.current_image, fov=fov) fig = visualizer_3d.draw_3dbboxes(st.session_state.current_image, cam_params, bbox_3d_results) if fig isnotNone: st.pyplot(fig) else: st.warning("3D可视化生成失败") -
历史记录管理
-
显示历史记录表格
-
清空历史记录按钮
-
导出历史记录为 CSV 功能
-
-
使用说明
-
展开式的详细使用指南
-
包含平台使用步骤、技术特点和应用场景
-
工作流程总结
-
用户上传图片并通过侧边栏进行配置
-
根据选择的检测模式构建相应的提示词
-
调用 AI API 进行推理处理
-
解析返回的结果并在主界面展示
-
对于目标检测模式,使用专门的可视化模块绘制边界框
-
将处理结果添加到历史记录中供后续查看
这个应用充分利用了 Qwen3-VL 的多模态能力,实现了从简单图像理解到复杂 3D 空间感知的功能,适用于多种实际应用场景。
完成以上代码编写并保存后,我们在CMD输入streamlit run app.py启用该应用,得到该应用界面如下。
(streamlit) E:\app>streamlit run app.py

  You can now view your Streamlit app in your browser.

  Local URL: http://localhost:8501
  Network URL: http://192.168.0.110:8501
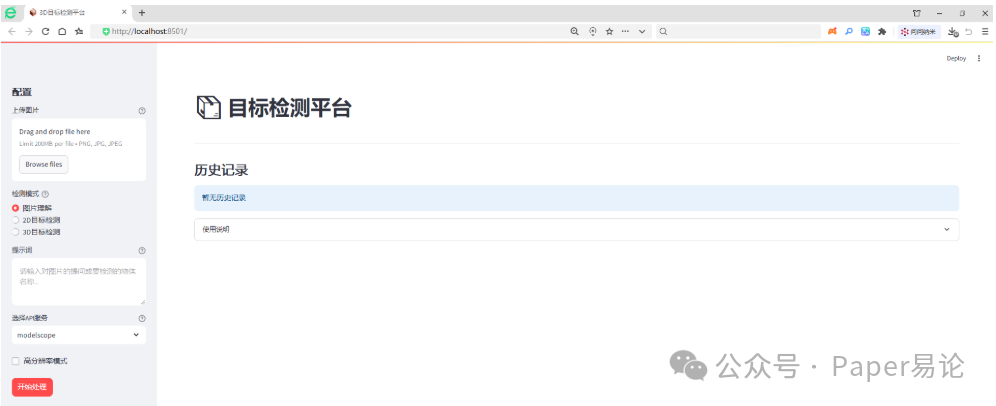
我们导入一张图片,先进行图片理解,在提示词输入:图中有什么物体。
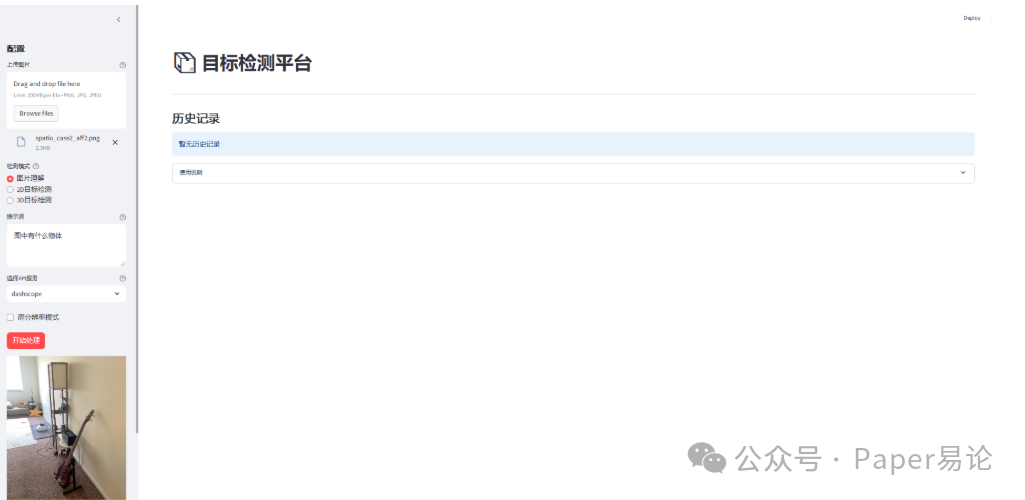
在完成图片导入及提示词编写后,点击开始处理。
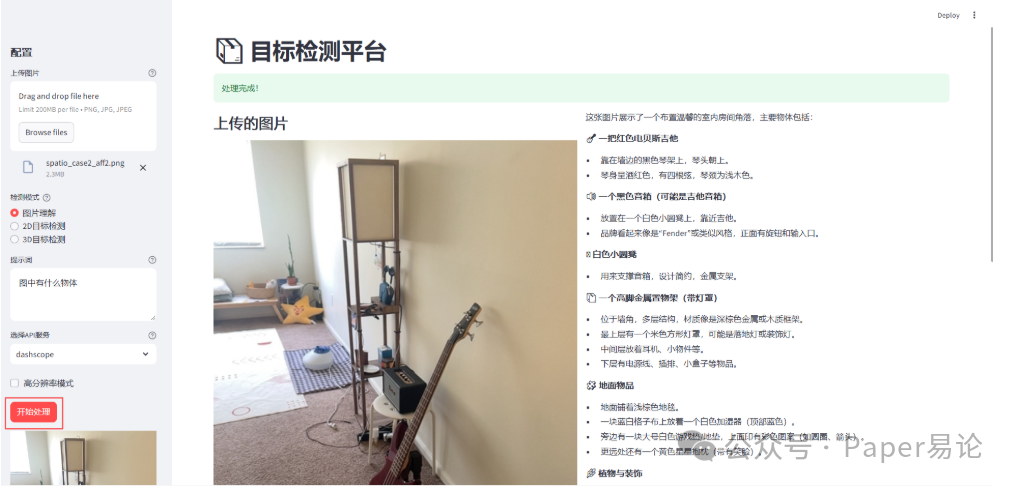
完成后,将在主界面展示上传的图片及图片理解内容,下面的历史记录将保留本次图片名称、理解结果及检测模式等信息。

接下来,我们体验2D目标检测。比如想标注吉他,在选择2D目标检测后,提示词输入吉他。
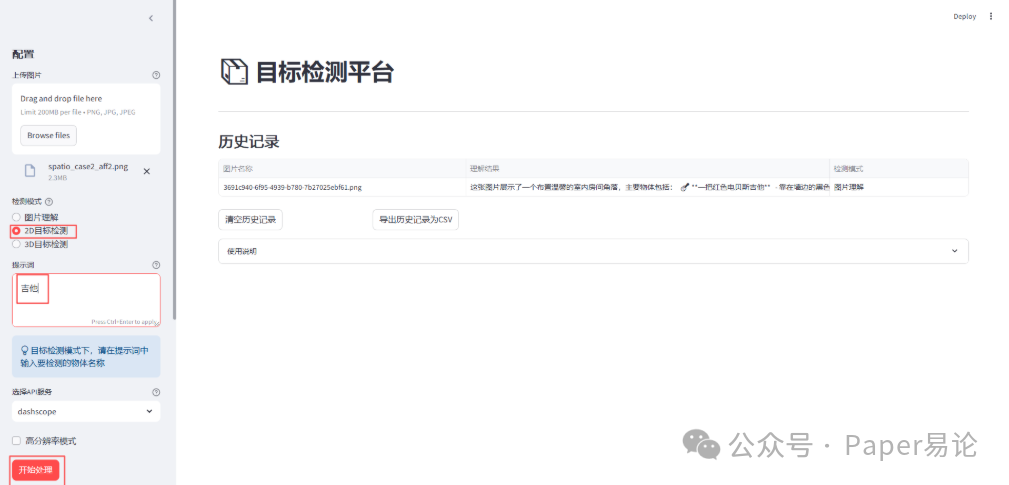
点击开始处理。

进行2D目标检测后,主界面左侧是原图片,右侧是在图中对吉他进行边界框及标签标注,效果不错。
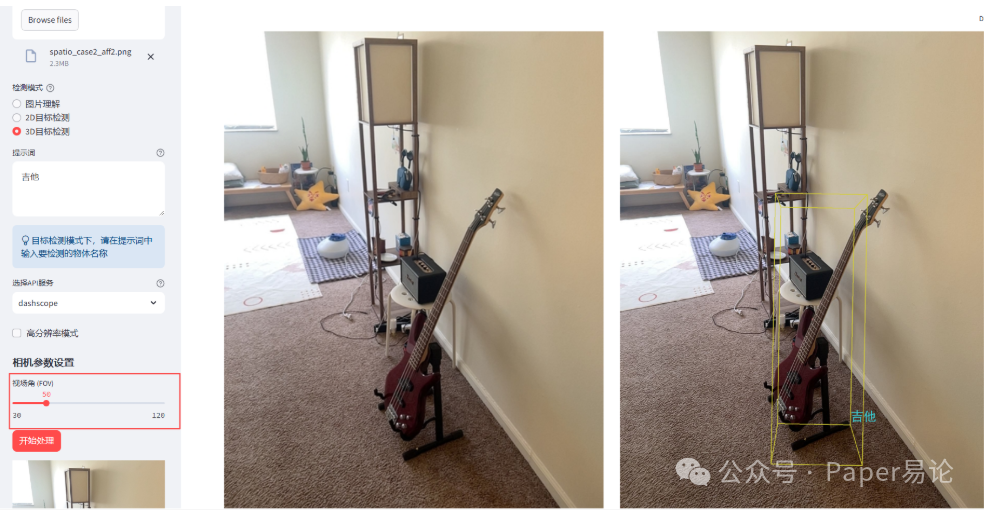
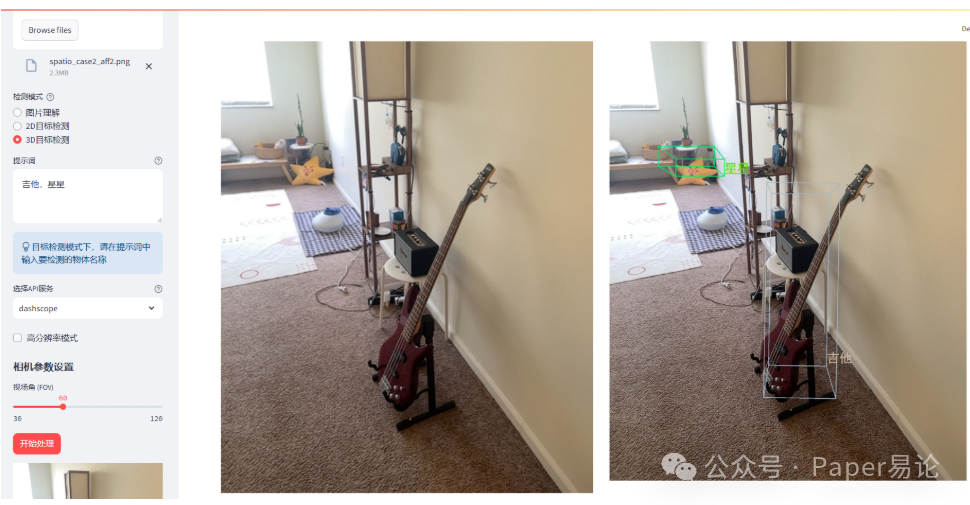
最后,我们体验3D目标检测。在选择3D目标检测后,提示词输入吉他。
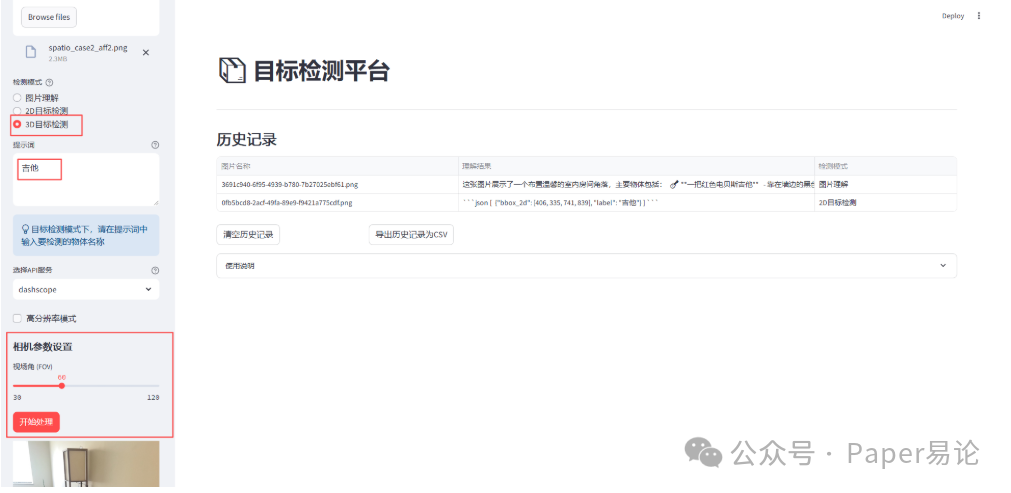
点击开始处理。

如果对3D边界框不满意,我们可以调整相机视场角,默认是60,我们将其调整为50,查看此时效果。
我们可以同时对图中多个目标进行检测,比如想同时标注吉他,星星两个物体,进行2D标注。
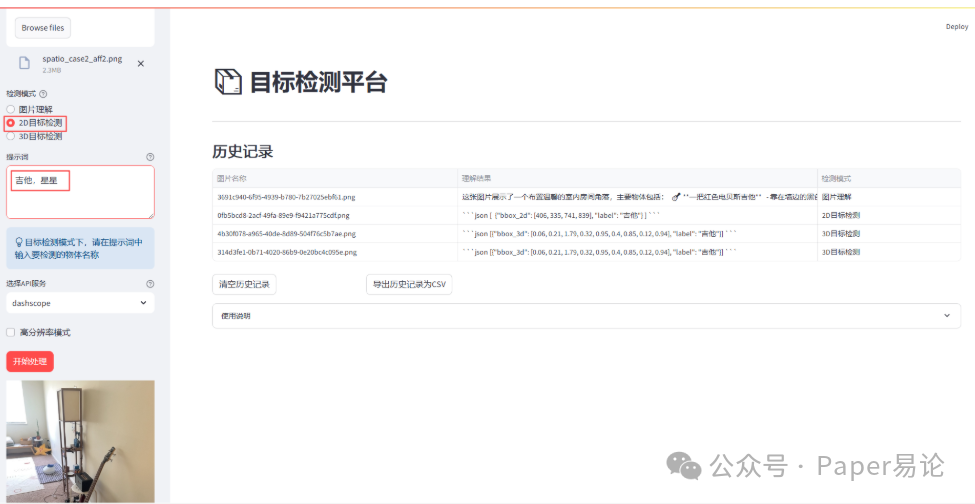
点击开始处理。
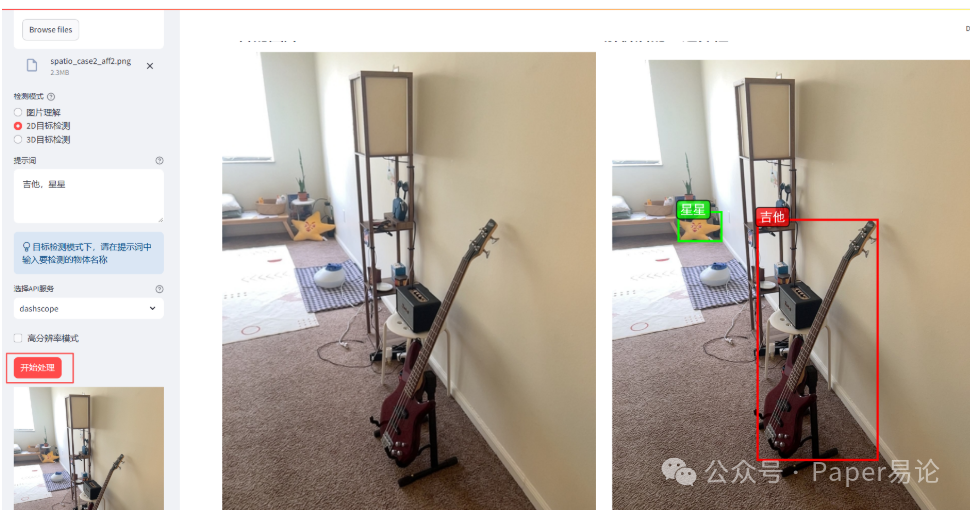
同时检测吉他和星星的2D效果不错。现在尝试3D效果。
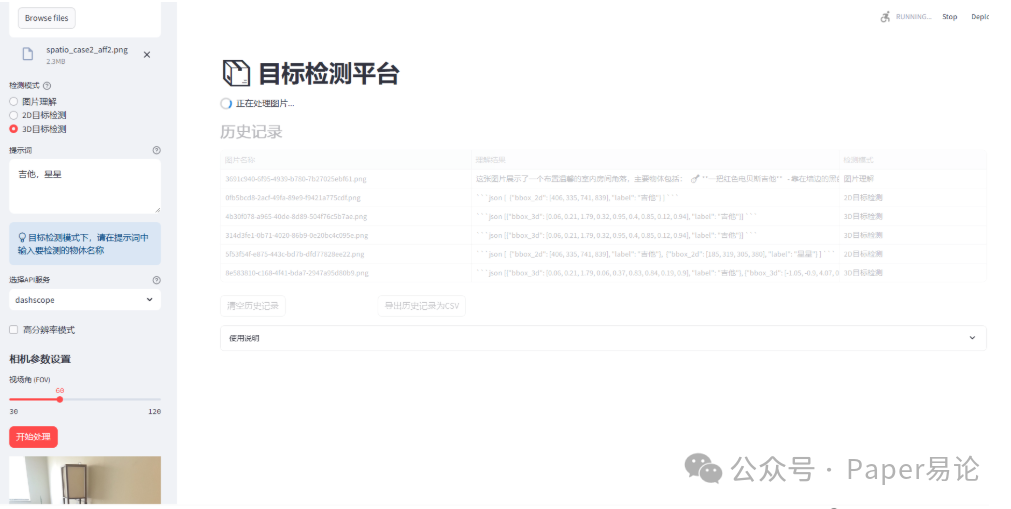
点击开始处理。
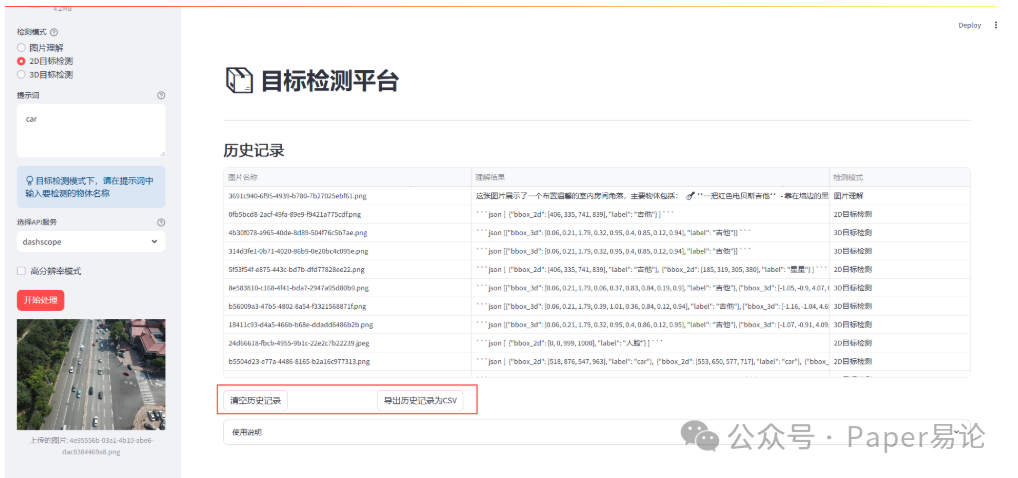
当然,我们也可以对密集型图片中的物体进行检测。比如找出图中的汽车,并绘制2D边框。

点击开始处理。

我们可以清空历史记录 或者 导出历史记录为csv。
也可以点击使用说明查看平台操作指南。

火山引擎开发者社区是火山引擎打造的AI技术生态平台,聚焦Agent与大模型开发,提供豆包系列模型(图像/视频/视觉)、智能分析与会话工具,并配套评测集、动手实验室及行业案例库。社区通过技术沙龙、挑战赛等活动促进开发者成长,新用户可领50万Tokens权益,助力构建智能应用。
更多推荐


 26
26 0
0- 0


 已为社区贡献15条内容

所有评论(0)