苍穹外卖复习总结
Redis(Remote Dictionary Server)是一个开源的、高性能的内存数据结构存储系统,也就是说,读取Redis中的数据不需要有磁盘IO操作,因此说Redis的性能很高,适用于那些频繁访问且数据量不大的数据。@Slf4j@Beanlog.info("创建Redis模板对象");//设置redis的连接工厂对象//设置redis的序列化器/*** 设置店铺的营业状态* @retur
1.概述
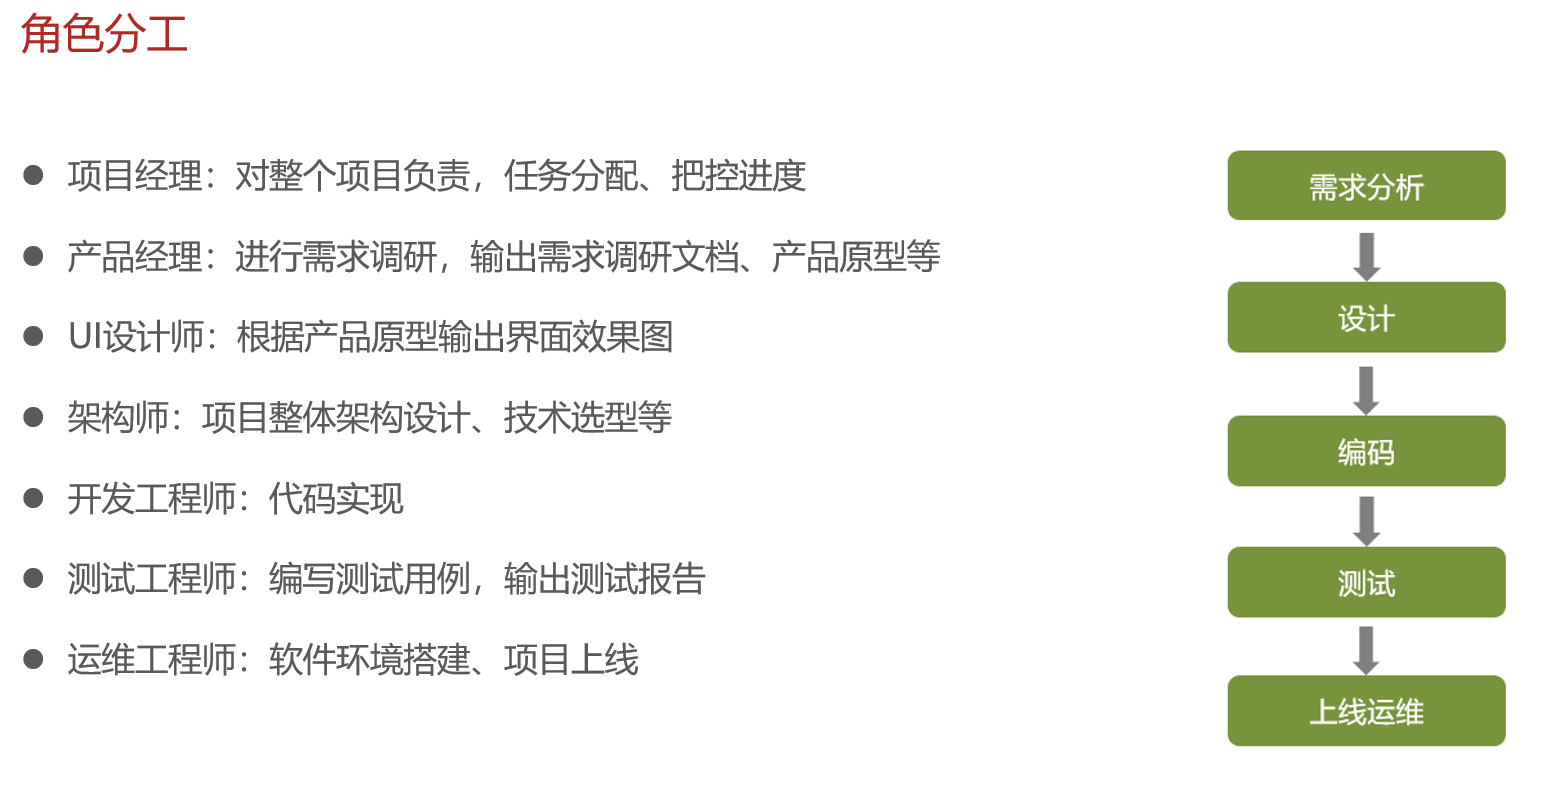
作为第一个项目,首先要了解软件开发的整体流程
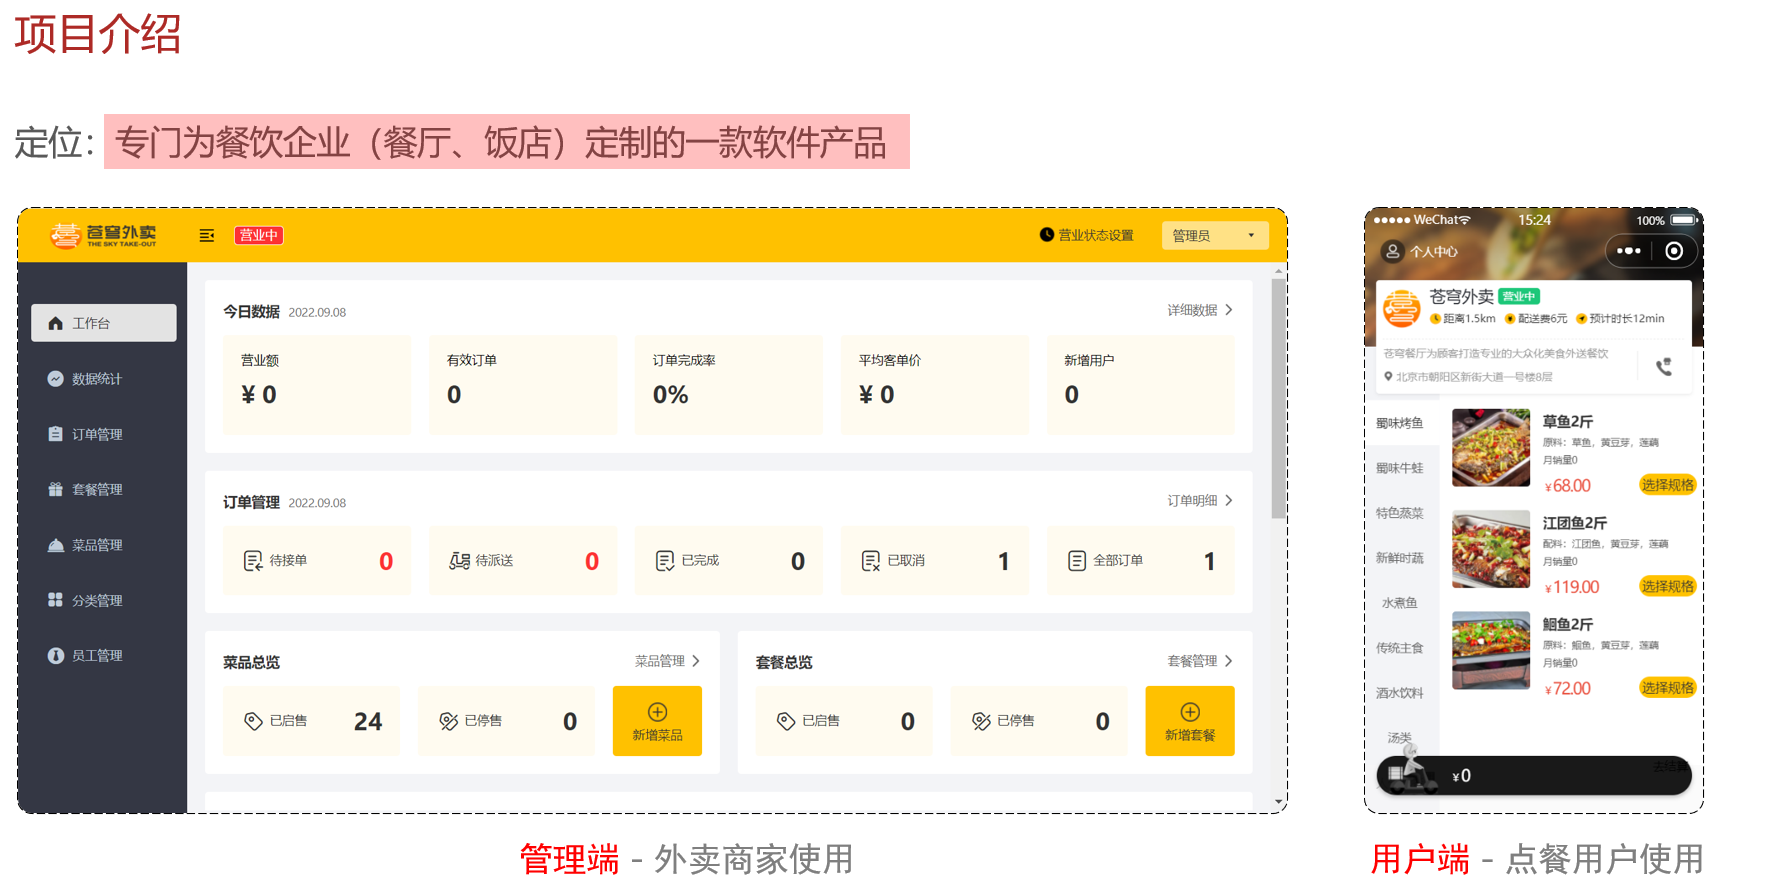
业务背景:
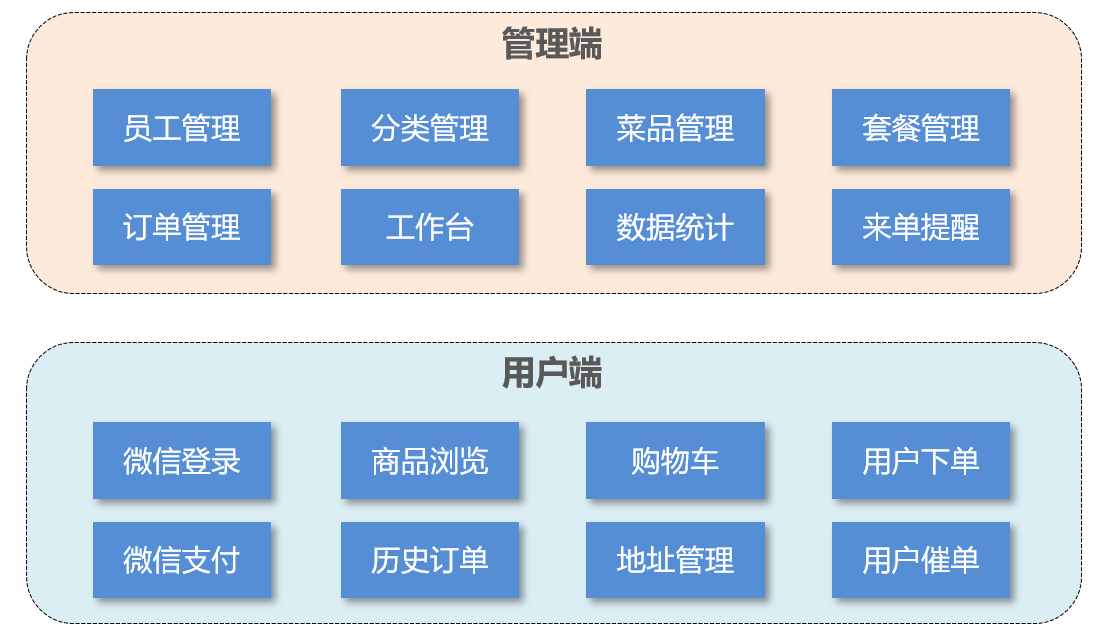
主要功能模块如下:
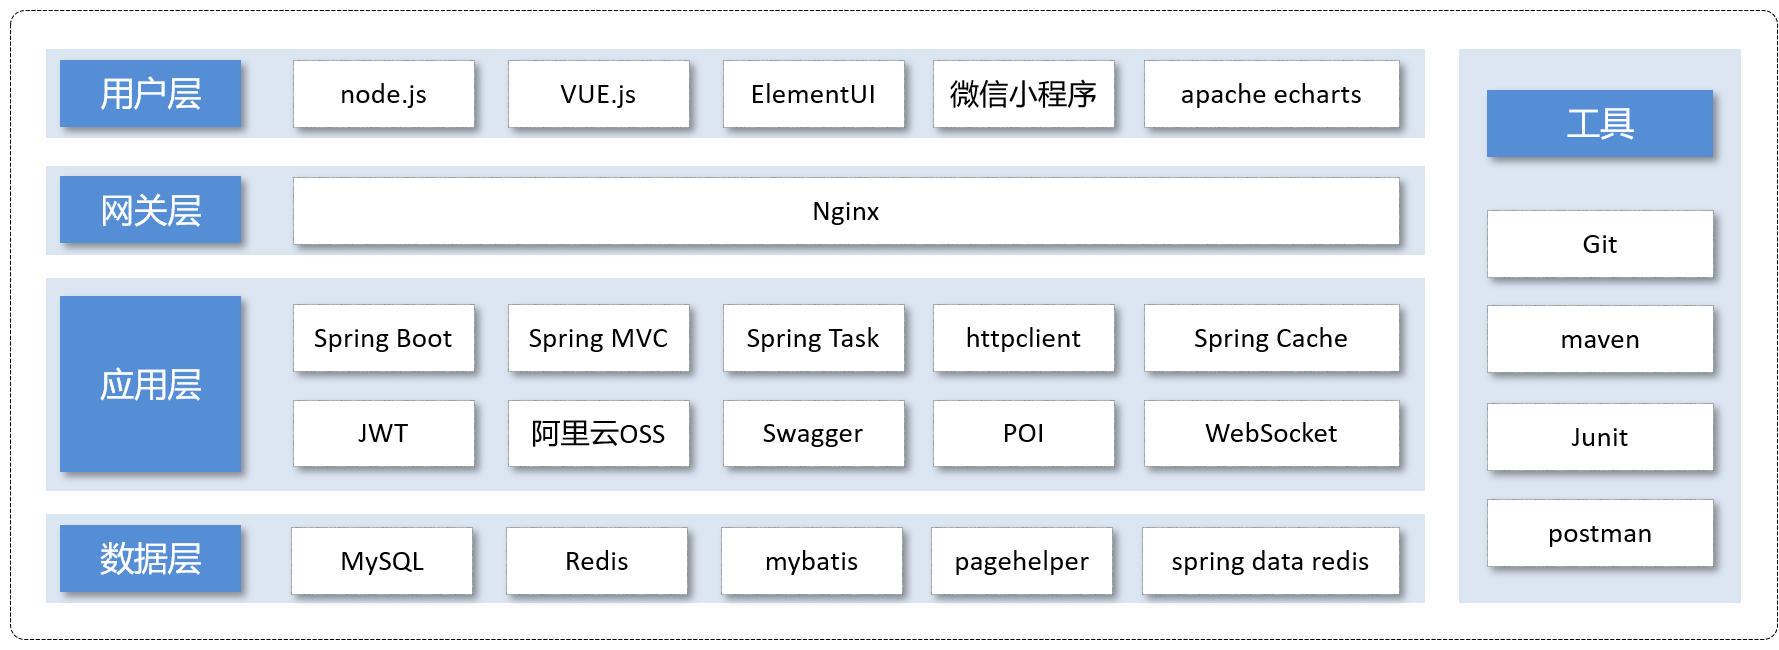
技术选型:
2.各模块简略CRUD总结
1.用户登录
用户登录流程非常简单,前端传递用户名和密码,后端使用EmployeeLoginDTO接收数据,然后调用业务Service层进行业务处理,先根据用户名查询数据库,如果没有查到抛出异常,查到后比对密码(先加密后比对),若密码不同抛出异常,最后验证一下账户状态,若账户被锁定抛出异常。
需要注意的是业务处理完成后需要生成Jwt令牌,其相关技术在章节3关键技术中进行总结
2.员工管理、分类管理
相关CRUD,前端发送请求,后端Controller层接收数据,调用Service层,Service层使用Mapper进行CRUD。分页查询需要使用PageHelper技术。由于前端传输的数据并没有用户ID这一信息,但在进行CRUD时很多情况下需要使用这一信息,因此引入ThreadLocal技术。为了日期信息在前端正确显示,引入消息转换器技术。这三种技术在章节3中详细总结。
3.菜品管理
CRUD方面需要注意的就是一些批量操作的sql使用方法,这里多加练习即可。一个比较有意思的接口是上传文件接口,这里用MultipartFile接收文件并且使用uuid构建文件名。这一章节涉及到的关键技术主要是AOP来自动填充一些字段,如创建时间、修改时间等,以及关于阿里云OSS存储服务的一些使用也需要学习一下,具体细节章节3中进行总结
4.店铺营业状态设置
这里查询的数据量很少,只是一个店铺的状态,并且只要登录都需要进行查询,因此采用Redis进行存储,具体细节章节3总结
5.微信登录,商品浏览,购物车
微信登陆详细流程章节3中进行总结,商品浏览则是CRUD部分,只是这里会用到Redis。由于用户点击对应的位置就需要对商品进行浏览,因此这是一个非常高频的请求,先查询Redis,如果Redis没有则查询数据库并把数据存到Redis中。
6.用户下单,订单支付
这里应该是这个项目目前最复杂的业务。对于用户下单,首先需要获取前端传来的地址,如果没有则抛出异常。获取地址后调用百度地图API,计算与店铺的距离,超过20km就不进行配送。满足条件后,根据用户ID获取当前购物车的数据,没有获取则抛出异常。获取完成后拷贝其信息到OrderDetail中,同时设置好Orders的其他字段,将OrderDetails,Orders分别插入对应的表,并且清空购物车。对于订单支付功能,主要在于微信支付的接口,章节3进行说明。
7.订单状态定时更新、来单提醒和客户催单
定时功能需要使用springTask技术,来单提醒和客户催单使用websocket技术。章节3进行总结。
8.图形报表
这里主要是一些业务逻辑处理格式的写法以及最终返回数据的格式和sql的写法需要注意。这里给出一个具体例子
  @Override
    public OrderReportVO ordersStatistics(LocalDate startDate, LocalDate endDate) {
        List<LocalDate> dates = new ArrayList<>();
        dates.add(startDate);
        while (!startDate.equals(endDate)) {
            startDate = startDate.plusDays(1);
            dates.add(startDate);
        }
        List<Integer> totalList = new ArrayList<>();
        List<Integer> effectiveList = new ArrayList<>();

        int totalOrderCount = 0;
        int effectiveOrderCount = 0;
        for (LocalDate date : dates) {
            LocalDateTime min = LocalDateTime.of(date, LocalTime.MIN);
            LocalDateTime max = LocalDateTime.of(date, LocalTime.MAX);
            Map<String, Object> map = new HashMap();
            map.put("min", min);
            map.put("max", max);
            Integer number_all = orderMapper.sumNumberByMap(map);
            totalOrderCount += number_all;
            totalList.add(number_all);
            map.put("status", Orders.COMPLETED);
            Integer number_effective = orderMapper.sumNumberByMap(map);
            effectiveList.add(number_effective);
            effectiveOrderCount += number_effective;
        }
        Double orderCompletionRate = ((double) effectiveOrderCount) / (double) totalOrderCount;
        return OrderReportVO.builder()
                .dateList(StringUtils.join(dates, ","))
                .orderCompletionRate(orderCompletionRate)
                .totalOrderCount(totalOrderCount)
                .validOrderCount(effectiveOrderCount)
                .orderCountList(StringUtils.join(totalList, ","))
                .validOrderCountList(StringUtils.join(effectiveList, ","))
                .build();
    }
9.数据统计
使用Apache POI操作表格
  @Override
    public void exportBusinessExcel(HttpServletResponse response) {
        //查询数据库获取营业数据
        LocalDate begin = LocalDate.now().minusDays(30);
        LocalDate end = LocalDate.now().minusDays(1);
        BusinessDataVO businessDataVO = getBusinessData(LocalDateTime.of(begin, LocalTime.MIN), LocalDateTime.of(end, LocalTime.MAX));
        //写入表格
        InputStream in = this.getClass().getClassLoader().getResourceAsStream("template/excel.xlsx");

        try {
            XSSFWorkbook workbook = new XSSFWorkbook(in);
            XSSFSheet sheet = workbook.getSheet("Sheet1");
            sheet.getRow(1).getCell(1).setCellValue("开始时间:"+begin+"结束时间:"+end+"               ");
            sheet.getRow(3).getCell(2).setCellValue(businessDataVO.getTurnover());
            sheet.getRow(3).getCell(4).setCellValue(businessDataVO.getOrderCompletionRate());
            sheet.getRow(3).getCell(6).setCellValue(businessDataVO.getNewUsers());
            sheet.getRow(4).getCell(2).setCellValue(businessDataVO.getValidOrderCount());
            sheet.getRow(4).getCell(4).setCellValue(businessDataVO.getUnitPrice());

            for (int i=0 ;i<30;i++){
                LocalDate date = begin.plusDays(i);
                BusinessDataVO vo = getBusinessData(LocalDateTime.of(date, LocalTime.MIN), LocalDateTime.of(date, LocalTime.MAX));
                sheet.getRow(7+i).getCell(1).setCellValue(date+"");
                sheet.getRow(7+i).getCell(2).setCellValue(vo.getOrderCompletionRate());
                sheet.getRow(7+i).getCell(3).setCellValue(vo.getValidOrderCount());
                sheet.getRow(7+i).getCell(4).setCellValue(vo.getOrderCompletionRate());
                sheet.getRow(7+i).getCell(5).setCellValue(vo.getUnitPrice());
                sheet.getRow(7+i).getCell(6).setCellValue(vo.getNewUsers());
            }
            ServletOutputStream out = response.getOutputStream();
            workbook.write(out);

            out.close();
            in.close();

        }catch (IOException e){
            e.printStackTrace();
        }
    }
3.关键技术点总结与学习
1.Jwt令牌
1.设计目的:在传统的 Cookie-Session 模式中,服务器需要将 Session 数据(如用户信息)存储在内存或数据库中,这是一个“状态”。在分布式或微服务架构中,处理请求的服务器可能不是创建 Session 的那台,这就需要进行复杂的“Session 同步”。JWT 将用户信息直接编码在令牌本身。服务器验证 JWT 签名有效后,就可以直接信任其中的信息,无需查询数据库或共享存储来验证用户身份。这使得应用天生就是无状态的、易于水平扩展。
2.使用方式:用户登录完成后,将设置的信息(例如用户id)放入一个哈希表中,再将其和服务器密钥、过期时间等信息输入已有的工具即可生成token,随后放入传输类返回给前端即可。后续前端发送请求时携带该token,JWT校验的过程是在拦截器进行的。使用拦截器的正确流程应该是:在拦截器包下面创建拦截器类,该类要实现HandlerInceptor接口,然后根据需要决定实现哪个方法,这里JWT需要在请求到达Controller层之前进行校验,因此实现preHandle,在该方法内部进行校验过程。在配置类中,实现addInterceptors配置拦截请求的类型即可。
 /**
     * 登录
     *
     * @param employeeLoginDTO
     * @return
     */
    @PostMapping("/login")
    @ApiOperation(value = "员工登录")
    public Result<EmployeeLoginVO> login(@RequestBody EmployeeLoginDTO employeeLoginDTO) {
        log.info("员工登录:{}", employeeLoginDTO);

        Employee employee = employeeService.login(employeeLoginDTO);

        //登录成功后,生成jwt令牌
        Map<String, Object> claims = new HashMap<>();
        claims.put(JwtClaimsConstant.EMP_ID, employee.getId());
        String token = JwtUtil.createJWT(
                jwtProperties.getAdminSecretKey(),
                jwtProperties.getAdminTtl(),
                claims);

        EmployeeLoginVO employeeLoginVO = EmployeeLoginVO.builder()
                .id(employee.getId())
                .userName(employee.getUsername())
                .name(employee.getName())
                .token(token)
                .build();

        return Result.success(employeeLoginVO);
    }
/** * 配置类,注册web层相关组件 */ @Configuration @Slf4j public class WebMvcConfiguration extends WebMvcConfigurationSupport { @Autowired private JwtTokenAdminInterceptor jwtTokenAdminInterceptor; @Autowired private JwtTokenUserInterceptor jwtTokenUserInterceptor; /** * 注册自定义拦截器 * * @param registry */ protected void addInterceptors(InterceptorRegistry registry) { log.info("开始注册自定义拦截器..."); registry.addInterceptor(jwtTokenAdminInterceptor) .addPathPatterns("/admin/**") .excludePathPatterns("/admin/employee/login"); registry.addInterceptor(jwtTokenUserInterceptor) .addPathPatterns("/user/**") .excludePathPatterns("/user/user/login") .excludePathPatterns("/user/shop/status"); } }/** * jwt令牌校验的拦截器 */ @Component @Slf4j public class JwtTokenAdminInterceptor implements HandlerInterceptor { @Autowired private JwtProperties jwtProperties; /** * 校验jwt * * @param request * @param response * @param handler * @return * @throws Exception */ public boolean preHandle(HttpServletRequest request, HttpServletResponse response, Object handler) throws Exception { //判断当前拦截到的是Controller的方法还是其他资源 if (!(handler instanceof HandlerMethod)) { //当前拦截到的不是动态方法,直接放行 return true; } //1、从请求头中获取令牌 String token = request.getHeader(jwtProperties.getAdminTokenName()); //2、校验令牌 try { log.info("jwt校验:{}", token); Claims claims = JwtUtil.parseJWT(jwtProperties.getAdminSecretKey(), token); Long empId = Long.valueOf(claims.get(JwtClaimsConstant.EMP_ID).toString()); BaseContext.setCurrentId(empId); //3、通过,放行 return true; } catch (Exception ex) { //4、不通过,响应401状态码 response.setStatus(401); return false; } } }
2.PageHelper分页(底层原理日后学习,目前我还不会)
PageHelper 是 MyBatis 生态中广泛使用的分页插件,通过简化 SQL 分页逻辑,帮助开发者高效实现数据库分页查询。它基于 MyBatis 的拦截器机制,自动将分页参数转换为数据库方言(如 MySQL 的 LIMIT、Oracle 的 ROWNUM),并支持复杂场景的分页需求。
PageHelper 的核心功能
自动分页
无需手动编写 LIMIT 和 OFFSET,通过简单 API 设置分页参数。多数据库支持
适配 MySQL、Oracle、PostgreSQL 等主流数据库的分页语法。物理分页
基于 SQL 改写实现真正的物理分页(非内存分页),性能高效。分页结果封装
提供 PageInfo 对象,包含分页数据、总记录数、总页数等元信息。排序支持
支持动态排序参数传递,自动拼接 ORDER BY 子句。public PageResult pageQuery(EmployeePageQueryDTO employeePageQueryDTO) { //开始分页 PageHelper.startPage(employeePageQueryDTO.getPage(), employeePageQueryDTO.getPageSize()); Page<Employee> page = employeeMapper.pageQUERY(employeePageQueryDTO); long total = page.getTotal(); List<Employee> records = page.getResult(); PageResult pageResult = new PageResult(total, records); return pageResult; }
3.ThreadLocal(重要,日后深入学习,目前简单梳理一下)
ThreadLocal叫做线程变量,意思是ThreadLocal中填充的变量属于当前线程,该变量对其他线程而言是隔离的,也就是说该变量是当前线程独有的变量。ThreadLocal为变量在每个线程中都创建了一个副本,那么每个线程可以访问自己内部的副本变量。
public class BaseContext {

    public static ThreadLocal<Long> threadLocal = new ThreadLocal<>();

    public static void setCurrentId(Long id) {
        threadLocal.set(id);
    }

    public static Long getCurrentId() {
        return threadLocal.get();
    }

    public static void removeCurrentId() {
        threadLocal.remove();
    }

}
由于笔者暂时还没深入学习JUC,也没系统学过操作系统,这里先简单说一下我自己目前的理解。Tomcat会给每一个请求单独分配一个线程,假设在上述代码中,不使用ThreadLocal来存储,直接使用Long存储。此时用户a登录,设置id为1,用户b再登录,设置id为2,此时用户a再次访问获取id,得到的结果是2,这显然是不正确的。而使用ThreadLocal则可以避免这种情况发生。这个时候又产生了一个问题,可不可以不使用static,然后在存储id时每次都手动new一个BaseContext类呢,答案当然是否定的。问题的关键在于,如果在拦截器中创建了实例,那么拦截器代码执行结束后这个实例就被垃圾回收了,后续又应该如何访问呢?我们的需求是决定了这个数据在整个线程上都存在,那么创建实例对象的方式自然就行不通了。
4.消息转换器
消息转换器主要是将SpringMVC中负责请求和响应的数据进行格式转换,为了让日期格式正确显示,我们可以在配置类上加入自己的消息转换器
@Override
    protected void extendMessageConverters(List<HttpMessageConverter<?>> converters){
        log.info( "扩展消息转换器...");
        //创建一个消息转换器对象
        MappingJackson2HttpMessageConverter converter = new MappingJackson2HttpMessageConverter();
        //需要为消息转换器设置一个对象转换器,对象转换器可以将Java对象序列化为json数据
        converter.setObjectMapper(new JacksonObjectMapper());
        converters.add(0,converter);
    }
这个转换器是我们自己定义的,具体代码如下:
/**
 * 对象映射器:基于jackson将Java对象转为json,或者将json转为Java对象
 * 将JSON解析为Java对象的过程称为 [从JSON反序列化Java对象]
 * 从Java对象生成JSON的过程称为 [序列化Java对象到JSON]
 */
public class JacksonObjectMapper extends ObjectMapper {

    public static final String DEFAULT_DATE_FORMAT = "yyyy-MM-dd";
    //public static final String DEFAULT_DATE_TIME_FORMAT = "yyyy-MM-dd HH:mm:ss";
    public static final String DEFAULT_DATE_TIME_FORMAT = "yyyy-MM-dd HH:mm";
    public static final String DEFAULT_TIME_FORMAT = "HH:mm:ss";

    public JacksonObjectMapper() {
        super();
        //收到未知属性时不报异常
        this.configure(FAIL_ON_UNKNOWN_PROPERTIES, false);

        //反序列化时,属性不存在的兼容处理
        this.getDeserializationConfig().withoutFeatures(DeserializationFeature.FAIL_ON_UNKNOWN_PROPERTIES);

        SimpleModule simpleModule = new SimpleModule()
                .addDeserializer(LocalDateTime.class, new LocalDateTimeDeserializer(DateTimeFormatter.ofPattern(DEFAULT_DATE_TIME_FORMAT)))
                .addDeserializer(LocalDate.class, new LocalDateDeserializer(DateTimeFormatter.ofPattern(DEFAULT_DATE_FORMAT)))
                .addDeserializer(LocalTime.class, new LocalTimeDeserializer(DateTimeFormatter.ofPattern(DEFAULT_TIME_FORMAT)))
                .addSerializer(LocalDateTime.class, new LocalDateTimeSerializer(DateTimeFormatter.ofPattern(DEFAULT_DATE_TIME_FORMAT)))
                .addSerializer(LocalDate.class, new LocalDateSerializer(DateTimeFormatter.ofPattern(DEFAULT_DATE_FORMAT)))
                .addSerializer(LocalTime.class, new LocalTimeSerializer(DateTimeFormatter.ofPattern(DEFAULT_TIME_FORMAT)));

        //注册功能模块 例如,可以添加自定义序列化器和反序列化器
        this.registerModule(simpleModule);
    }
}
可以看到这里对日期数据的格式进行了限定。
5.AOP自动填充公共字段
由于很多表都包含create_time,update_time,create_user,update_user这四个字段,每次操作的时候都需要手动填充或者修改,较为麻烦和冗余,因此需要一种方法指定在执行特定操作时自动对这些字段进行填充,自然想到了Spring中的AOP。学习AOP,先要了解几个特定名词(这里结合本项目的代码进行说明):
切点(Join Point):切点指的是程序执行的某个特定点,比如方法的调用、异常的抛出、字段的访问等。在AOP中,切点是潜在的切入位置,表示横切关注点可以在何处插入到应用代码中。
@Pointcut("execution(* com.sky.mapper.*.*(..)) && @annotation(com.sky.annotatiton.AutoFill)")
    public void autoFillPointCut(){

    }
这里表达的是mapper包下面所有类中被AutoFill注解的方法
切面(Aspect) :切面是AOP的核心模块,指的是封装横切关注点的模块化单元。切面通常是一个类,其中包含特定的逻辑,如日志记录、事务管理等功能。切面定义了在何时、何地、以何种方式“切入”到业务代码中。每个切面都可以包含多个切点和通知,以决定切面在应用中的行为方式。在AOP框架中,切面通常通过注解或配置文件进行定义,使其可以动态地附加到目标对象上,实现解耦和代码复用。
/**
 * 自定义切面类
 */

@Aspect
@Component
@Slf4j
public class AutoFillAspect {

    @Pointcut("execution(* com.sky.mapper.*.*(..)) && @annotation(com.sky.annotatiton.AutoFill)")
    public void autoFillPointCut(){

    }

    /**
     * 前置通知,为公共字段赋值
     * @param joinPoint
     */
    @Before("autoFillPointCut()")
    public void beforeAutoFill(JoinPoint joinPoint) {
        log.info("开始进行公共字段的填充...");
        //获取当前拦截方法的操作类型
        MethodSignature methodSignature = (MethodSignature) joinPoint.getSignature();
        AutoFill autofFill = methodSignature.getMethod().getAnnotation(AutoFill.class);
        OperationType operation = autofFill.value();
        //获取到当前被拦截的方法的参数
        Object[] args = joinPoint.getArgs();
        if (args.length == 0 || args[0] == null) {
            return;
        }
        Object entity = args[0];
        LocalDateTime now = LocalDateTime.now();
        Long currentId = BaseContext.getCurrentId();

        if (operation == OperationType.INSERT) {
            try {
                Method setCreateTime = entity.getClass().getDeclaredMethod(AutoFillConstant.SET_CREATE_TIME, LocalDateTime.class);
                Method setCreateUser = entity.getClass().getDeclaredMethod(AutoFillConstant.SET_CREATE_USER, Long.class);
                Method setUpdateTime = entity.getClass().getDeclaredMethod(AutoFillConstant.SET_UPDATE_TIME, LocalDateTime.class);
                Method setUpdateUser = entity.getClass().getDeclaredMethod(AutoFillConstant.SET_UPDATE_USER, Long.class);
                setCreateTime.invoke(entity, now);
                setCreateUser.invoke(entity, currentId);
                setUpdateTime.invoke(entity, now);
                setUpdateUser.invoke(entity, currentId);
            } catch (Exception e) {
                e.printStackTrace();
            }

        } else if (operation == OperationType.UPDATE) {
            try {
                Method setUpdateTime = entity.getClass().getDeclaredMethod(AutoFillConstant.SET_UPDATE_TIME, LocalDateTime.class);
                Method setUpdateUser = entity.getClass().getDeclaredMethod(AutoFillConstant.SET_UPDATE_USER, Long.class);
                setUpdateTime.invoke(entity, now);
                setUpdateUser.invoke(entity, currentId);
            } catch (Exception e) {
                e.printStackTrace();
            }

        }
    }
}
想要理解本项目中的AOP使用理解这两个核心概念就够了,其余八股文日后详细再学习,@Before注解表示的是在对应的方法执行前织入代码。这里通过反射获取到一些参数后再通过反射执行对应的方法即可。
6.阿里云OSS服务
这里我创建了自己的阿里云账号,在springboot项目中,我们可以在配置文件中先写好需要的配置项,再创建自己的Utile类,在配置类中注册交给spring统一管理,具体如何上传文件,可以查询官方SDK文档,本项目中相关代码如下:
@Data
@AllArgsConstructor
@Slf4j
public class AliOssUtil {

    private String endpoint;
    private String accessKeyId;
    private String accessKeySecret;
    private String bucketName;

    /**
     * 文件上传
     *
     * @param bytes
     * @param objectName
     * @return
     */
    public String upload(byte[] bytes, String objectName) {

        // 创建OSSClient实例。
        OSS ossClient = new OSSClientBuilder().build(endpoint, accessKeyId, accessKeySecret);

        try {
            // 创建PutObject请求。
            ossClient.putObject(bucketName, objectName, new ByteArrayInputStream(bytes));
        } catch (OSSException oe) {
            System.out.println("Caught an OSSException, which means your request made it to OSS, "
                    + "but was rejected with an error response for some reason.");
            System.out.println("Error Message:" + oe.getErrorMessage());
            System.out.println("Error Code:" + oe.getErrorCode());
            System.out.println("Request ID:" + oe.getRequestId());
            System.out.println("Host ID:" + oe.getHostId());
        } catch (ClientException ce) {
            System.out.println("Caught an ClientException, which means the client encountered "
                    + "a serious internal problem while trying to communicate with OSS, "
                    + "such as not being able to access the network.");
            System.out.println("Error Message:" + ce.getMessage());
        } finally {
            if (ossClient != null) {
                ossClient.shutdown();
            }
        }

        //文件访问路径规则 https://BucketName.Endpoint/ObjectName
        StringBuilder stringBuilder = new StringBuilder("https://");
        stringBuilder
                .append(bucketName)
                .append(".")
                .append(endpoint)
                .append("/")
                .append(objectName);

        log.info("文件上传到:{}", stringBuilder.toString());

        return stringBuilder.toString();
    }
}
/**
 * 创建阿里OSS配置对象
 */
@Configuration
@Slf4j
public class OssConfiguration {
    @Bean
    @ConditionalOnMissingBean
    public AliOssUtil aliOssUtil(AliOssProperties aliOssProperties){
        log.info("开始创建AliOssUtil对象");
        return new AliOssUtil(aliOssProperties.getEndpoint(),aliOssProperties.getAccessKeyId(),
                aliOssProperties.getAccessKeySecret(),aliOssProperties.getBucketName());


    }
}
7.Redis(重要,下一步详细学习,这里只总结本项目中的应用)
Redis(Remote Dictionary Server)是一个开源的、高性能的 内存数据结构存储系统,也就是说,读取Redis中的数据不需要有磁盘IO操作,因此说Redis的性能很高,适用于那些频繁访问且数据量不大的数据。在Java中操作Redis的方式如下:
@Slf4j
@Configuration
public class RedisConfiguration {

    @Bean
    public RedisTemplate redisTemplate(RedisConnectionFactory redisConnectionFactory) {
        log.info("创建Redis模板对象");
        RedisTemplate redisTemplate = new RedisTemplate();
        //设置redis的连接工厂对象
        redisTemplate.setConnectionFactory(redisConnectionFactory);
        //设置redis的序列化器
        redisTemplate.setKeySerializer(new StringRedisSerializer());
        return redisTemplate;

    }

}
/** * 设置店铺的营业状态 * @param status * @return */ @PutMapping("/{status}") @ApiOperation(value = "设置店铺营业状态") public Result setStatus(@PathVariable Integer status){ log.info("设置店铺的营业状态为:{}",status); redisTemplate.opsForValue().set(SHOP_STATUS, status); return Result.success(status); } /** * 获取店铺的营业状态 * @return */ @ApiOperation(value = "获取营业状态") @GetMapping("/status") public Result<Integer> getStatus(){ Integer status =(Integer) redisTemplate.opsForValue().get("SHOP_STATUS"); log.info("获取店铺的营业状态为:{}",status==1?"营业中":"打样中"); return Result.success(status); }
8.微信登录
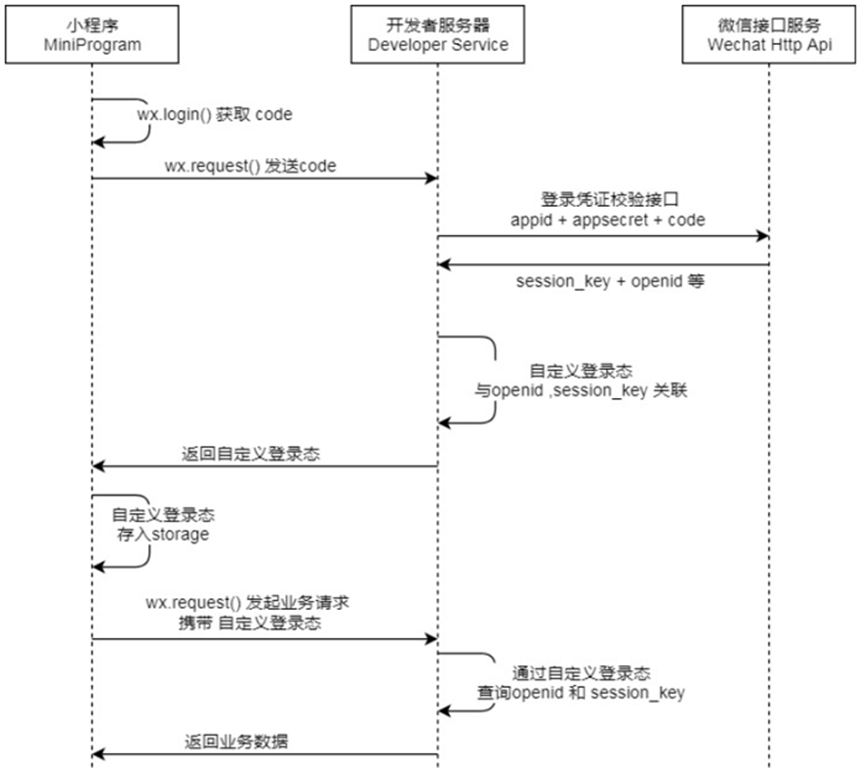
上图是微信官方给出的登录流程,这里发送请求使用HTTPClient,自定义HTTPClient工具类如下:
/**
 * Http工具类
 */
public class HttpClientUtil {

    static final  int TIMEOUT_MSEC = 5 * 1000;

    /**
     * 发送GET方式请求
     * @param url
     * @param paramMap
     * @return
     */
    public static String doGet(String url,Map<String,String> paramMap){
        // 创建Httpclient对象
        CloseableHttpClient httpClient = HttpClients.createDefault();

        String result = "";
        CloseableHttpResponse response = null;

        try{
            URIBuilder builder = new URIBuilder(url);
            if(paramMap != null){
                for (String key : paramMap.keySet()) {
                    builder.addParameter(key,paramMap.get(key));
                }
            }
            URI uri = builder.build();

            //创建GET请求
            HttpGet httpGet = new HttpGet(uri);

            //发送请求
            response = httpClient.execute(httpGet);

            //判断响应状态
            if(response.getStatusLine().getStatusCode() == 200){
                result = EntityUtils.toString(response.getEntity(),"UTF-8");
            }
        }catch (Exception e){
            e.printStackTrace();
        }finally {
            try {
                response.close();
                httpClient.close();
            } catch (IOException e) {
                e.printStackTrace();
            }
        }

        return result;
    }

    /**
     * 发送POST方式请求
     * @param url
     * @param paramMap
     * @return
     * @throws IOException
     */
    public static String doPost(String url, Map<String, String> paramMap) throws IOException {
        // 创建Httpclient对象
        CloseableHttpClient httpClient = HttpClients.createDefault();
        CloseableHttpResponse response = null;
        String resultString = "";

        try {
            // 创建Http Post请求
            HttpPost httpPost = new HttpPost(url);

            // 创建参数列表
            if (paramMap != null) {
                List<NameValuePair> paramList = new ArrayList();
                for (Map.Entry<String, String> param : paramMap.entrySet()) {
                    paramList.add(new BasicNameValuePair(param.getKey(), param.getValue()));
                }
                // 模拟表单
                UrlEncodedFormEntity entity = new UrlEncodedFormEntity(paramList);
                httpPost.setEntity(entity);
            }

            httpPost.setConfig(builderRequestConfig());

            // 执行http请求
            response = httpClient.execute(httpPost);

            resultString = EntityUtils.toString(response.getEntity(), "UTF-8");
        } catch (Exception e) {
            throw e;
        } finally {
            try {
                response.close();
            } catch (IOException e) {
                e.printStackTrace();
            }
        }

        return resultString;
    }

    /**
     * 发送POST方式请求
     * @param url
     * @param paramMap
     * @return
     * @throws IOException
     */
    public static String doPost4Json(String url, Map<String, String> paramMap) throws IOException {
        // 创建Httpclient对象
        CloseableHttpClient httpClient = HttpClients.createDefault();
        CloseableHttpResponse response = null;
        String resultString = "";

        try {
            // 创建Http Post请求
            HttpPost httpPost = new HttpPost(url);

            if (paramMap != null) {
                //构造json格式数据
                JSONObject jsonObject = new JSONObject();
                for (Map.Entry<String, String> param : paramMap.entrySet()) {
                    jsonObject.put(param.getKey(),param.getValue());
                }
                StringEntity entity = new StringEntity(jsonObject.toString(),"utf-8");
                //设置请求编码
                entity.setContentEncoding("utf-8");
                //设置数据类型
                entity.setContentType("application/json");
                httpPost.setEntity(entity);
            }

            httpPost.setConfig(builderRequestConfig());

            // 执行http请求
            response = httpClient.execute(httpPost);

            resultString = EntityUtils.toString(response.getEntity(), "UTF-8");
        } catch (Exception e) {
            throw e;
        } finally {
            try {
                response.close();
            } catch (IOException e) {
                e.printStackTrace();
            }
        }

        return resultString;
    }
    private static RequestConfig builderRequestConfig() {
        return RequestConfig.custom()
                .setConnectTimeout(TIMEOUT_MSEC)
                .setConnectionRequestTimeout(TIMEOUT_MSEC)
                .setSocketTimeout(TIMEOUT_MSEC).build();
    }

}
登录时用map封装好参数,向给定的地址发送请求即可,具体实现如下:
@Service
public class UserServiceImpl implements UserService {
    public static final String WX_LOGIN_URL = "https://api.weixin.qq.com/sns/jscode2session";

    @Autowired
    UserMapper userMapper;

    @Autowired
    private WeChatProperties weChatProperties;

    @Override
    @Transactional
    public User login(UserLoginDTO userLoginDTO) {
        //调用微信接口服务
        String openid =getOpenid(userLoginDTO.getCode());
        if(openid==null){
            throw new LoginFailedException("登陆失败");
        }
        //判断当前用户是否为新用户
        User user=userMapper.getUserByOpenid(openid);
        if(user==null){
            user=User.builder()
                    .openid(openid)
                    .createTime(LocalDateTime.now())
                    .build();
            userMapper.insert(user);
        }
        return user;

    }

    private String getOpenid(String code){
        Map<String, String> params = new HashMap<String, String>();

        params.put("appid", weChatProperties.getAppid());
        params.put("secret", weChatProperties.getSecret());
        params.put("js_code",code);
        params.put("grant_type", "authorization_code");

        String json =  HttpClientUtil.doGet(WX_LOGIN_URL,params);
        JSONObject jsonObject = JSONObject.parseObject(json);
        String openid = jsonObject.getString("openid");

        return openid;
    }
}
所谓的自定义登录态实际上便是JWTtoken
  /**
     * 微信登录
     * @param userLoginDTO
     * @return
     */
    @PostMapping("/login")
    @ApiOperation(value = "微信登录")
    public Result<UserLoginVO> login(@RequestBody UserLoginDTO userLoginDTO) {
        log.info("微信用户登录:{}", userLoginDTO.getCode());
        User user = userService.login(userLoginDTO);
        Map<String, Object> claims = new HashMap<>();
        claims.put(JwtClaimsConstant.USER_ID, user.getId());
        String token = JwtUtil.createJWT(jwtProperties.getUserSecretKey(), jwtProperties.getUserTtl(), claims);

        UserLoginVO userLoginVO = UserLoginVO.builder()
                .id(user.getId())
                .openid(user.getOpenid())
                .token(token)
                .build();

        return Result.success(userLoginVO);
    }
9.百度地图API
比较简单,创建个人开发者账号,在配置文件配置好需要的参数,使用HTTPClient工具按照要求发送请求即可
    private Double router(String user_address) {
        String origin = getLocation(address, ak);
        String user_location = getLocation(user_address, ak);
        Map<String, String> map = new HashMap<String, String>();
        map.put("origin", origin);
        map.put("destination", user_location);
        map.put("ak",ak);
        map.put("output", "json");
        String re = HttpClientUtil.doGet("https://api.map.baidu.com/direction/v2/riding", map);
        JSONObject jsonObject = JSONObject.parseObject(re);
        String distance = jsonObject.getJSONObject("result").getJSONArray("routes").getJSONObject(0).getString("distance");
        Double distanceLong = Double.parseDouble(distance);
        return distanceLong;
    }

    private String getLocation(String addressl, String akl) {
        HashMap<String, String> map_origin = new HashMap<String, String>();
        map_origin.put("address", addressl);
        map_origin.put("ak", akl);
        map_origin.put("output", "json");
        String origin = HttpClientUtil.doGet("https://api.map.baidu.com/geocoding/v3/", map_origin);

        JSONObject jsonObject = JSONObject.parseObject(origin);
        if(!jsonObject.getString("status").equals("0")){
            throw new OrderBusinessException("店铺地址解析失败");
        }
        JSONObject result = jsonObject.getJSONObject("result");
        JSONObject location_j = result.getJSONObject("location");
        Double latValue = location_j.getDouble("lat");
        Double lngValue = location_j.getDouble("lng");
        String location = latValue.toString() + "," + lngValue.toString();
        return location;
    }
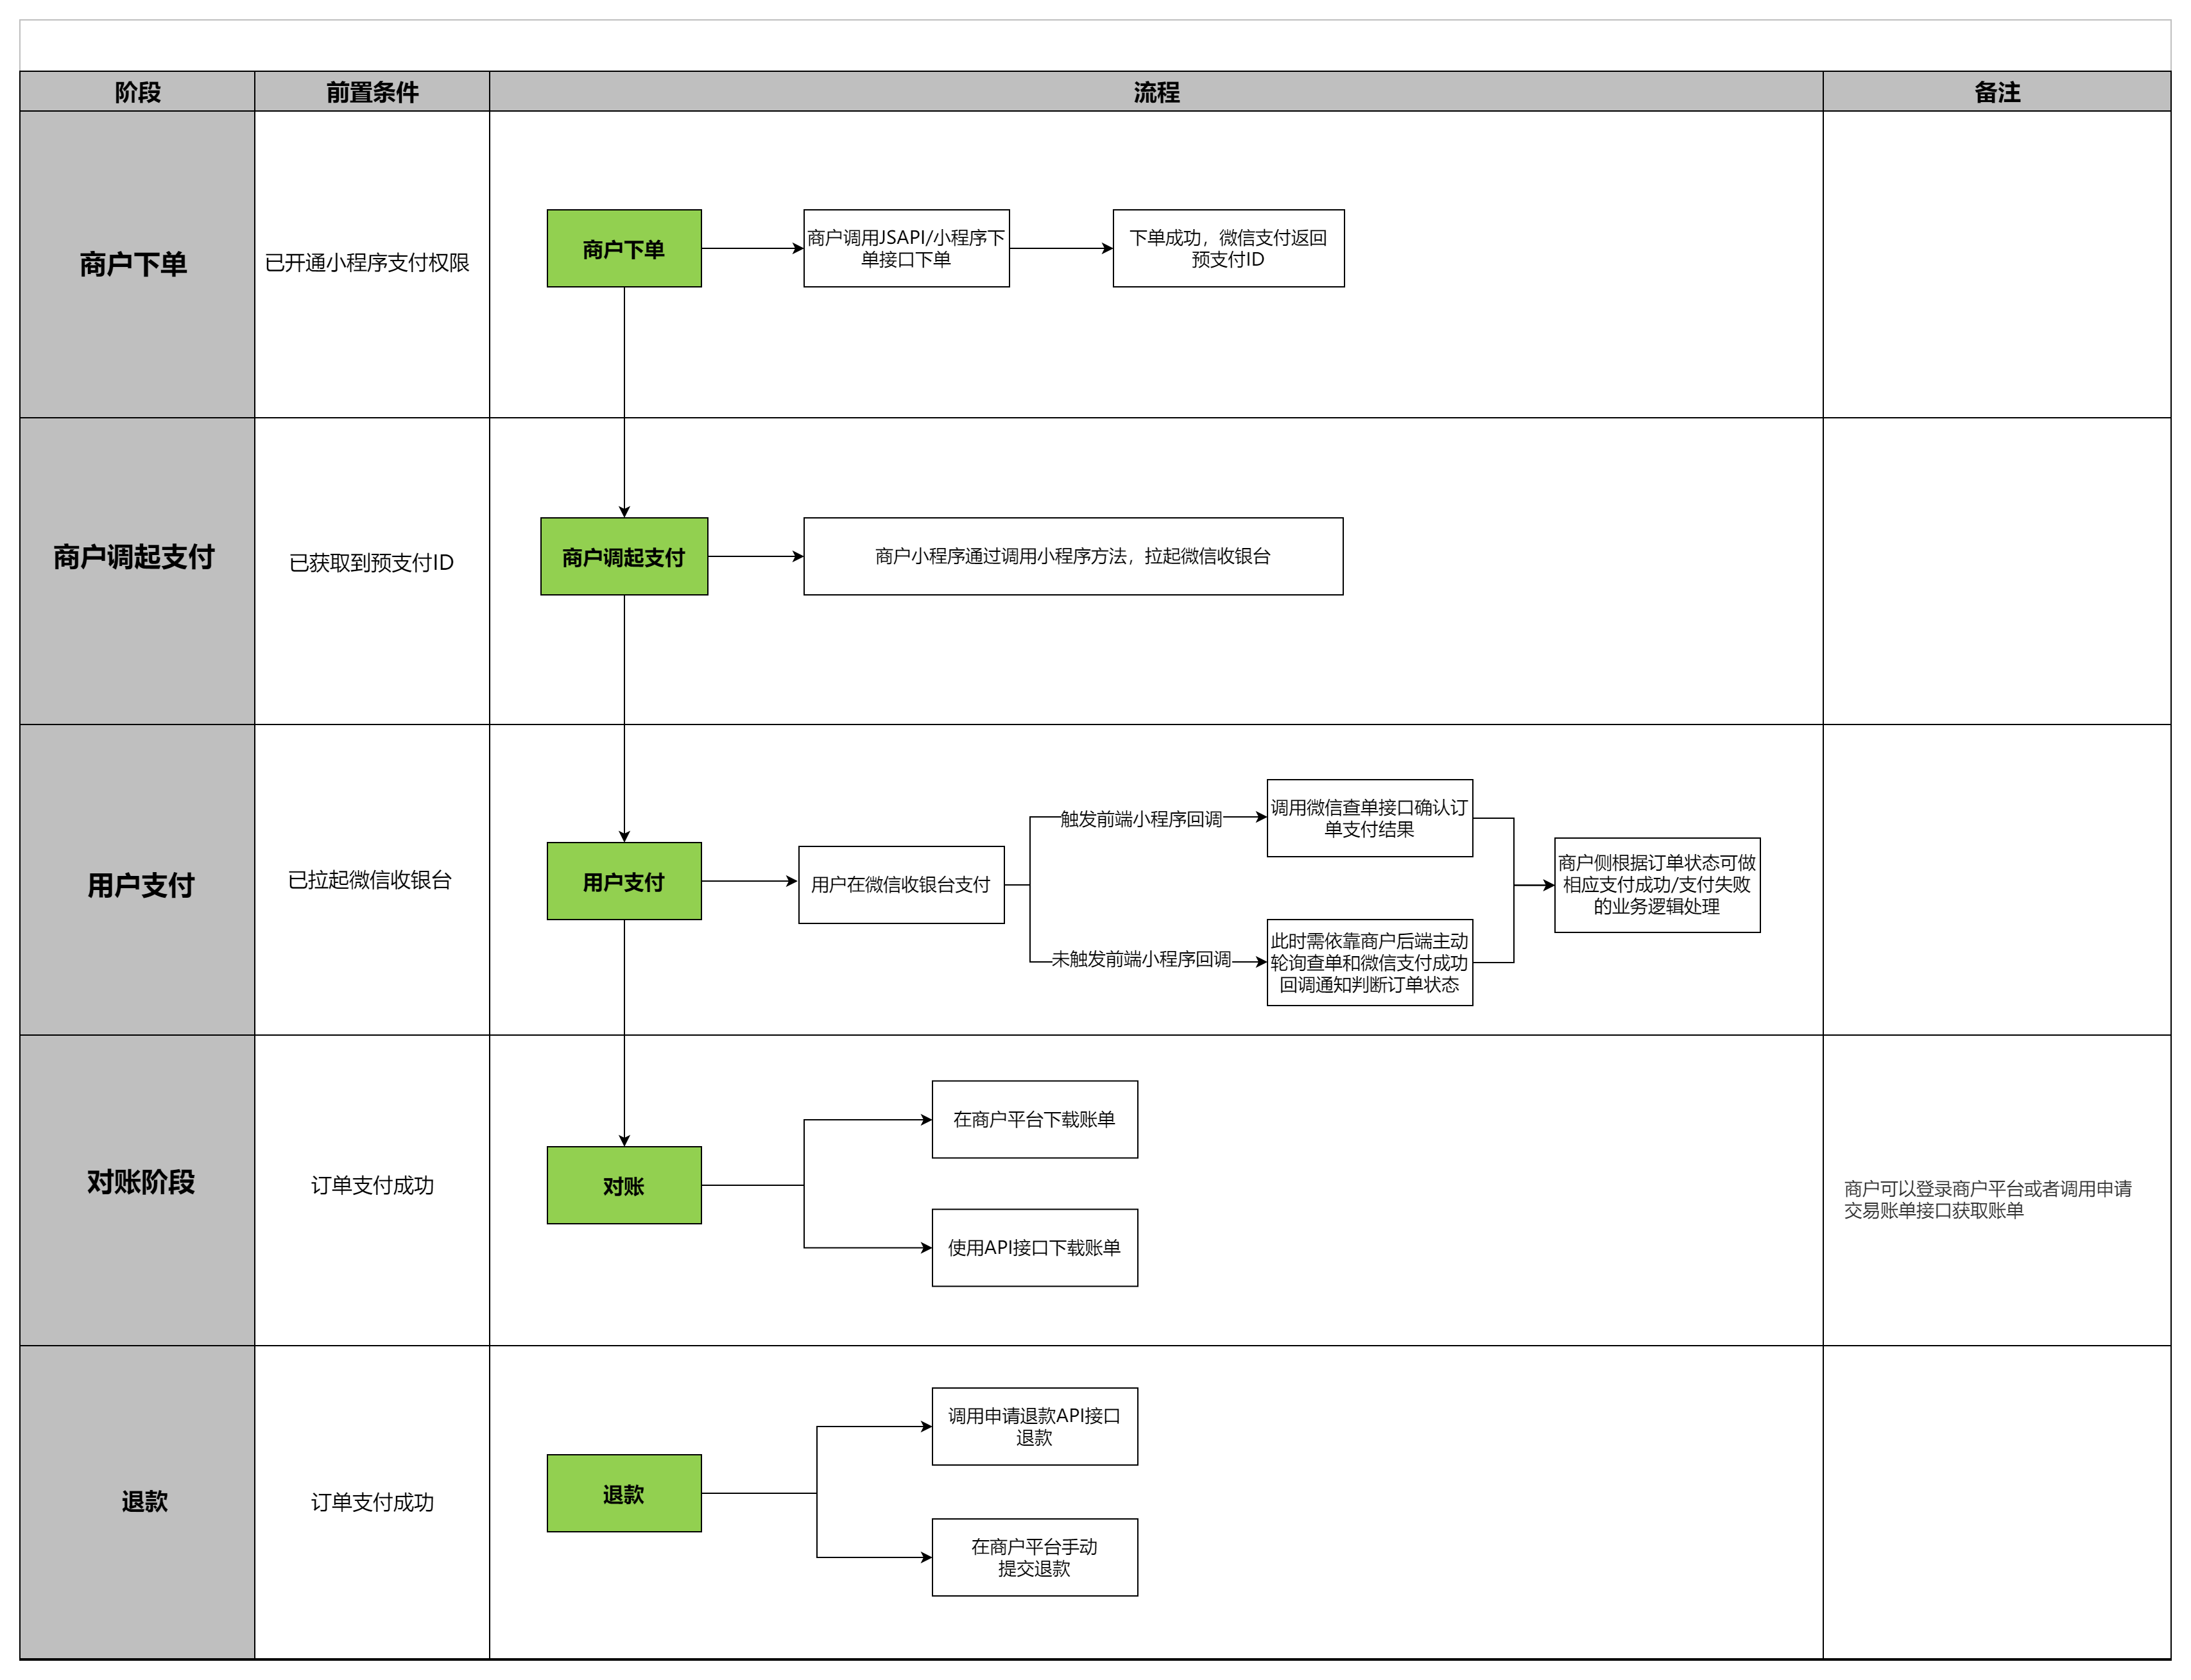
10.微信支付流程(不同于视频实现)
这里视频里的实现我觉得是有一定的问题,这里是官方给出的最新实现
具体步骤实现的一些细节都可以在官方文档里找到。笔者这里查阅了很多资料,实现方式并没有官方给的复杂,所以目前暂时先不深入探究了。
11.SpringTask
Spring Task 是Spring框架提供的任务调度工具,可以按照约定的时间自动执行某个代码逻辑。Spring Task使用步骤:
1.导入maven坐标 spring-context(已存在)
2.EnableScheduling 开启任务调度
3.自定义定时任务类
@Component
@Slf4j
public class OrderTask {

    @Autowired
    OrderMapper orderMapper;

    @Scheduled(cron = "0 * * * * *")
    public void processTimeOut() {
        log.info("定时处理超时订单:{}", LocalDateTime.now());
        List<Orders> list = orderMapper.selectByPayStatus(Orders.PENDING_PAYMENT,LocalDateTime.now().plusMinutes(-15));
        if ( list!=null && list.size() > 0) {
            for (Orders order : list) {
                order.setStatus(Orders.CANCELLED);
                order.setCancelReason("订单超时");
                order.setCancelTime(LocalDateTime.now());
                orderMapper.update(order);
            }
        }
    }

    @Scheduled(cron = "0 0 1 * * *")
    public  void processDelivery(){
        log.info("处理一直在派送中的订单:{}", LocalDateTime.now());
        List<Orders> list = orderMapper.selectByPayStatus(Orders.DELIVERY_IN_PROGRESS,LocalDateTime.now().plusMinutes(-60));
        if ( list!=null && list.size() > 0) {
            for (Orders order : list) {
                order.setStatus(Orders.COMPLETED);
                orderMapper.update(order);
            }
        }
    }

}
12.WebSocket
WebSocket 是基于 TCP 的一种新的网络协议。它实现了浏览器与服务器全双工通信——浏览器和服务器只需要完成一次握手,两者之间就可以创建持久性的连接, 并进行双向数据传输。
用户下单并且支付成功后,需要第一时间通知外卖商家。这时就需要使用WebSocket技术,以最快向商家通知。另外,用户催单时也需要向商家通知。
/**
 * WebSocket配置类,用于注册WebSocket的Bean
 */
@Configuration
public class WebSocketConfiguration {

    @Bean
    public ServerEndpointExporter serverEndpointExporter() {
        return new ServerEndpointExporter();
    }

}
/** * WebSocket服务 */ @Component @ServerEndpoint("/ws/{sid}") public class WebSocketServer { //存放会话对象 private static Map<String, Session> sessionMap = new HashMap(); /** * 连接建立成功调用的方法 */ @OnOpen public void onOpen(Session session, @PathParam("sid") String sid) { System.out.println("客户端:" + sid + "建立连接"); sessionMap.put(sid, session); } /** * 收到客户端消息后调用的方法 * * @param message 客户端发送过来的消息 */ @OnMessage public void onMessage(String message, @PathParam("sid") String sid) { System.out.println("收到来自客户端:" + sid + "的信息:" + message); } /** * 连接关闭调用的方法 * * @param sid */ @OnClose public void onClose(@PathParam("sid") String sid) { System.out.println("连接断开:" + sid); sessionMap.remove(sid); } /** * 群发 * * @param message */ public void sendToAllClient(String message) { Collection<Session> sessions = sessionMap.values(); for (Session session : sessions) { try { //服务器向客户端发送消息 session.getBasicRemote().sendText(message); } catch (Exception e) { e.printStackTrace(); } } } }@Override public void reminder(Long id) { Orders orders = orderMapper.getById(id); // 校验订单是否存在 if (orders == null ) { throw new OrderBusinessException(MessageConstant.ORDER_STATUS_ERROR); } Map<String,Object> map = new HashMap(); map.put("type",2); map.put("orderId",orders.getId()); map.put("content","订单号:"+orders.getNumber()); String json = JSONObject.toJSONString(map); webSocketServer.sendToAllClient(json); }

火山引擎开发者社区是火山引擎打造的AI技术生态平台,聚焦Agent与大模型开发,提供豆包系列模型(图像/视频/视觉)、智能分析与会话工具,并配套评测集、动手实验室及行业案例库。社区通过技术沙龙、挑战赛等活动促进开发者成长,新用户可领50万Tokens权益,助力构建智能应用。
更多推荐


 33
33 0
0- 0


 已为社区贡献1条内容

所有评论(0)